It’s finally here! After many requests, the iGyaan team has finally built a budget gaming PC. We made a gaming computer for just under INR 25,000 and have provided links to all the parts that are available online. Furthermore, we have also provided step by step instructions as to how you can build it yourself.
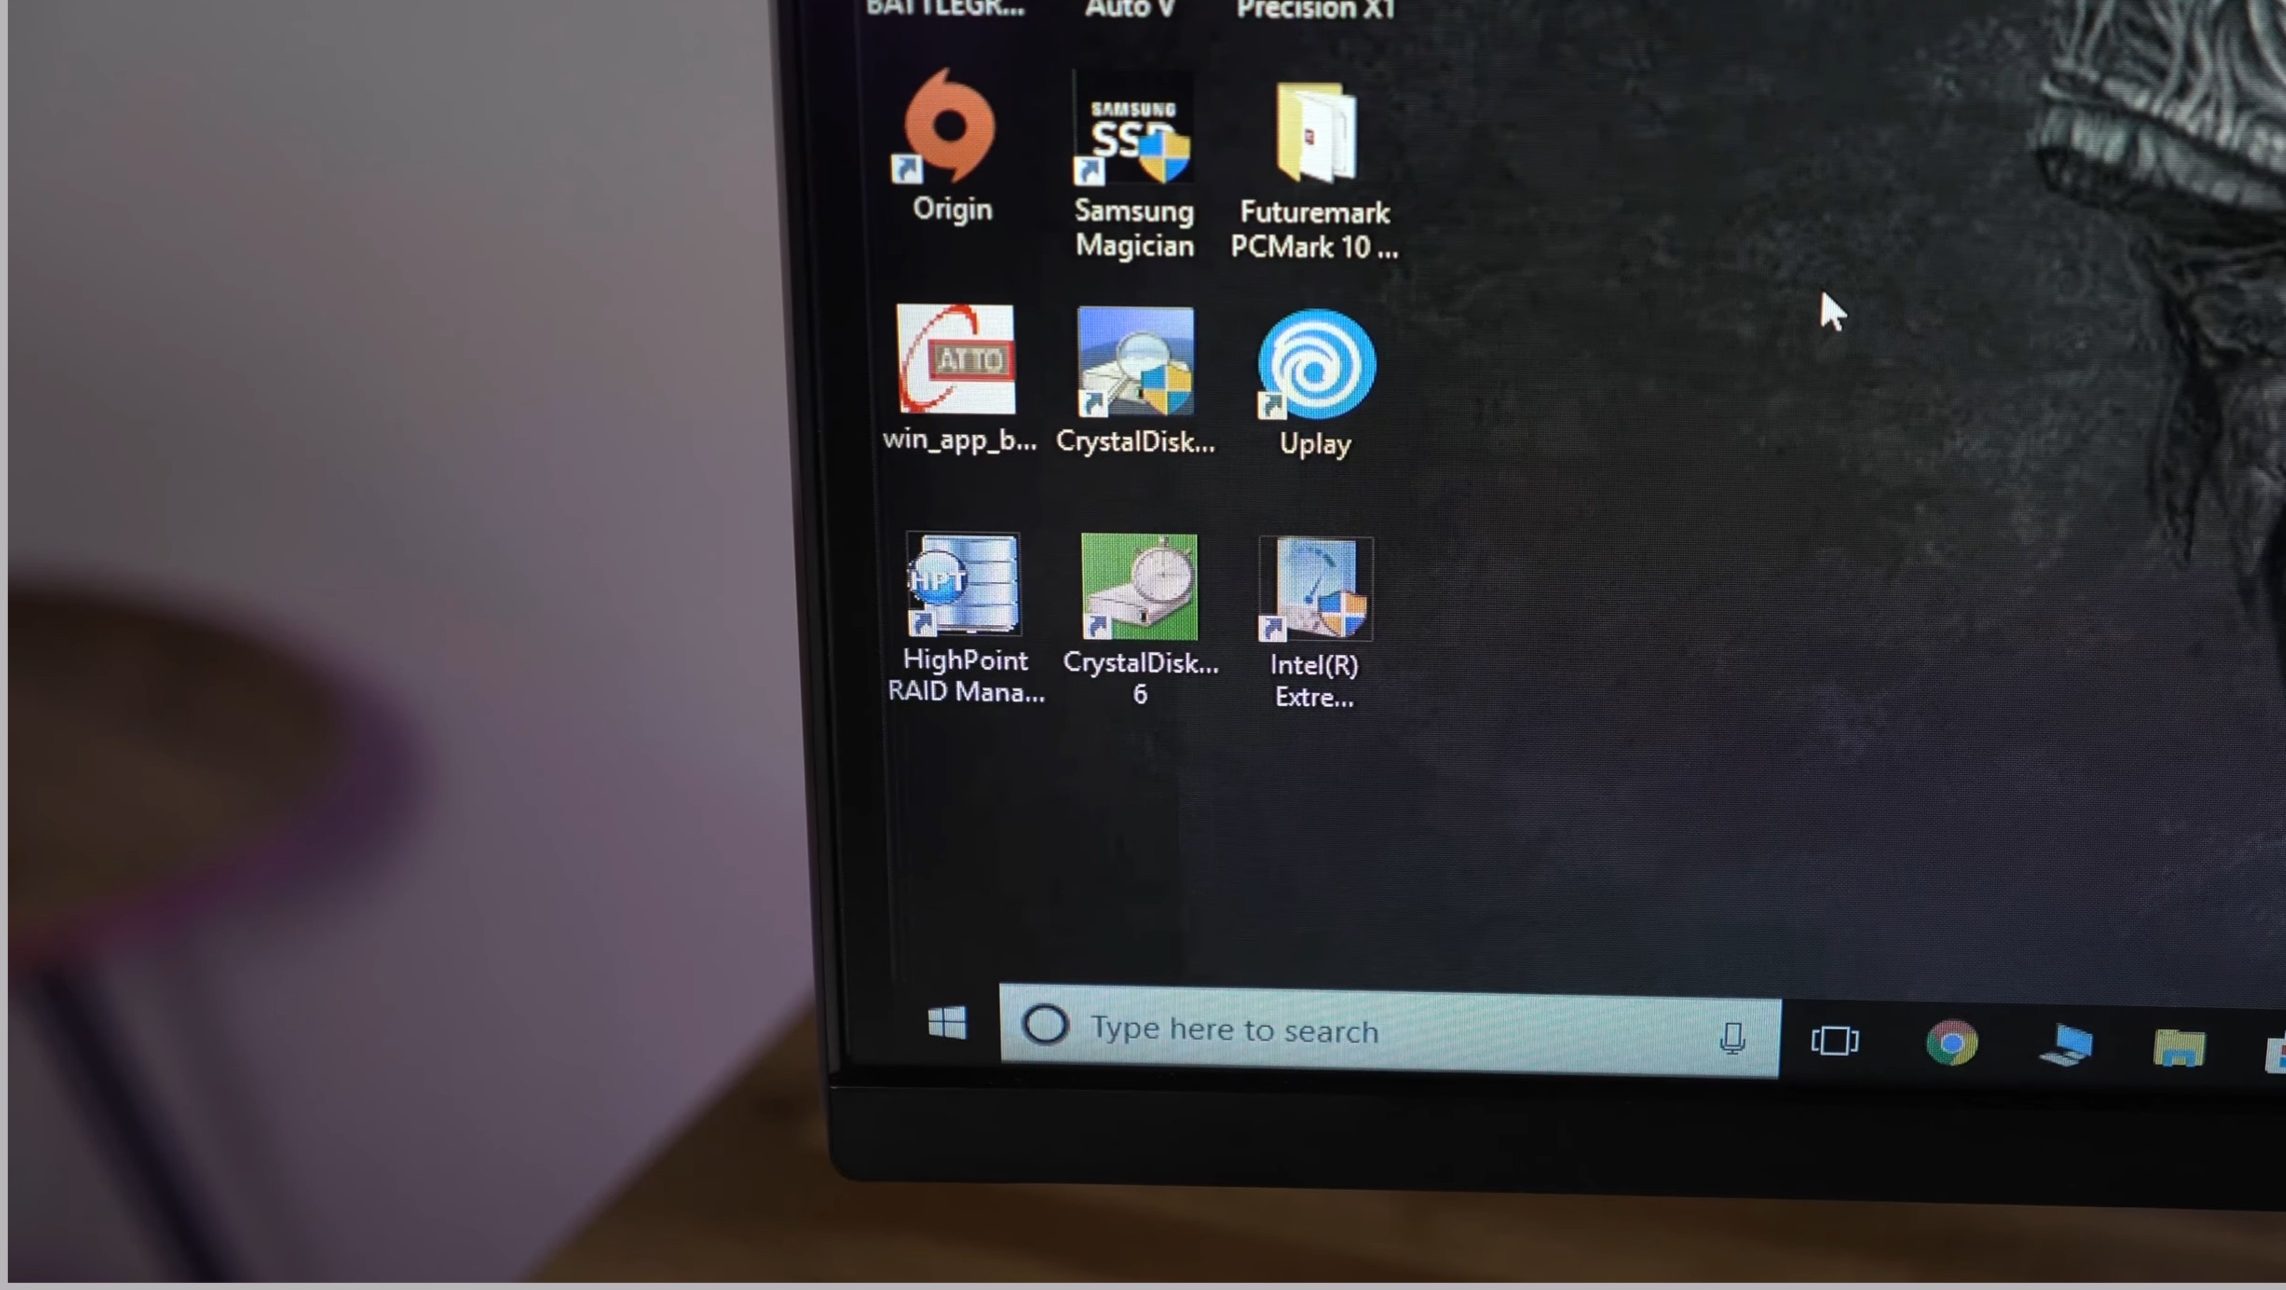
Gaming PC Parts
One of the hardest aspects of building a budget gaming PC is deciding on the components. We have used parts that are easily accessible and are available online while leaving room for future upgradability. Here is a list of what we used along with their respective buying links:
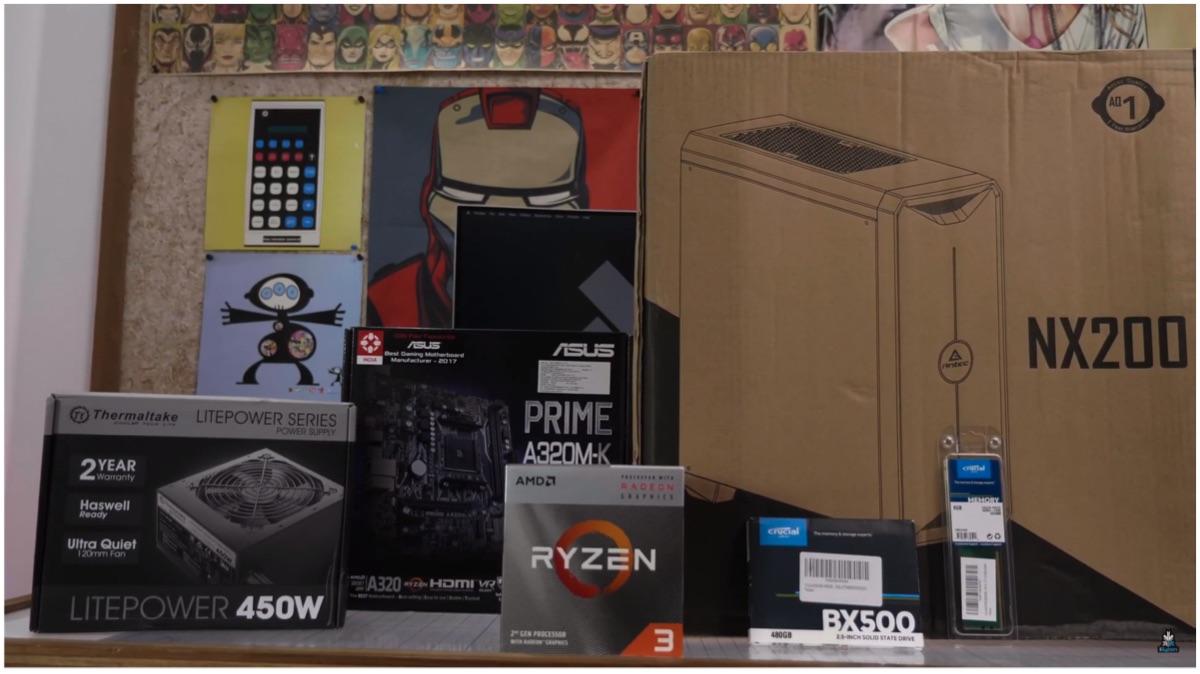
- Case: Antec NX200 (Click here to buy)
- Motherboard: Asus A320 (Click here to buy)
- Processor: Ryzen 3 3200G (Click here to buy)
- RAM: Crucial Basics 8GB (Click here to buy)
- SSD: Crucial Basics 480GB (Click here to buy)
- PSU: Thermaltake 450 (Click here to buy)
- LED Strip (Click here to buy)
= Total cost incurred is Rs. 24,617
Note: The parts we acquired may have their prices vary.
How To Build A Gaming PC
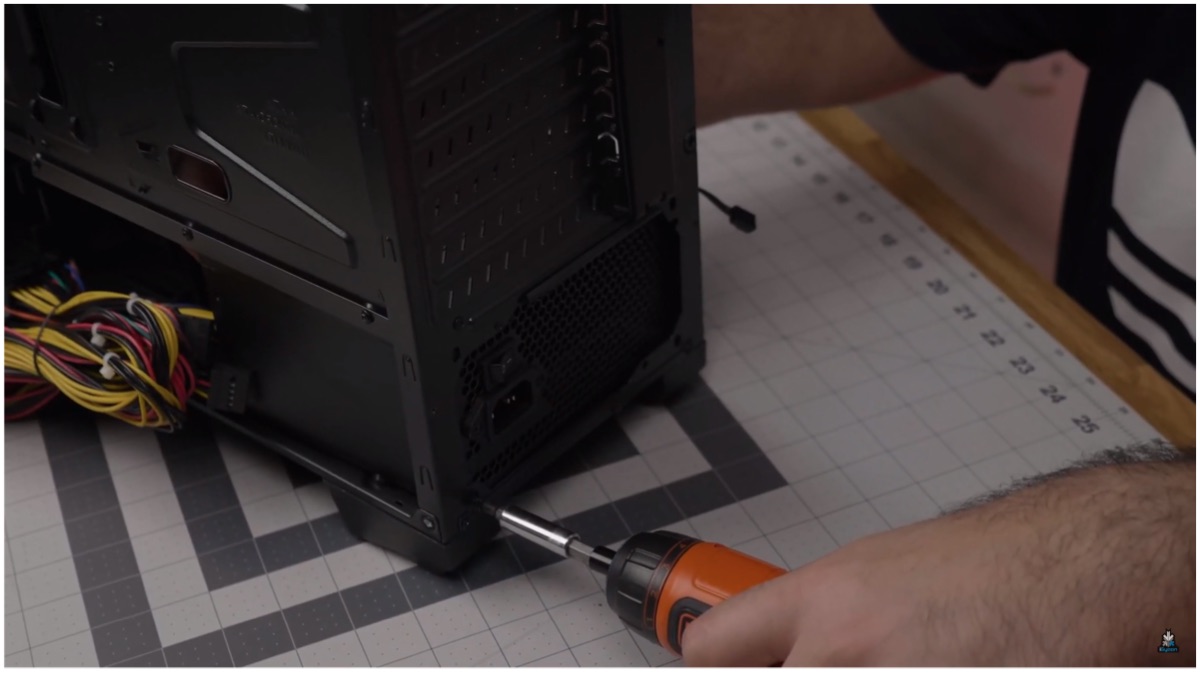
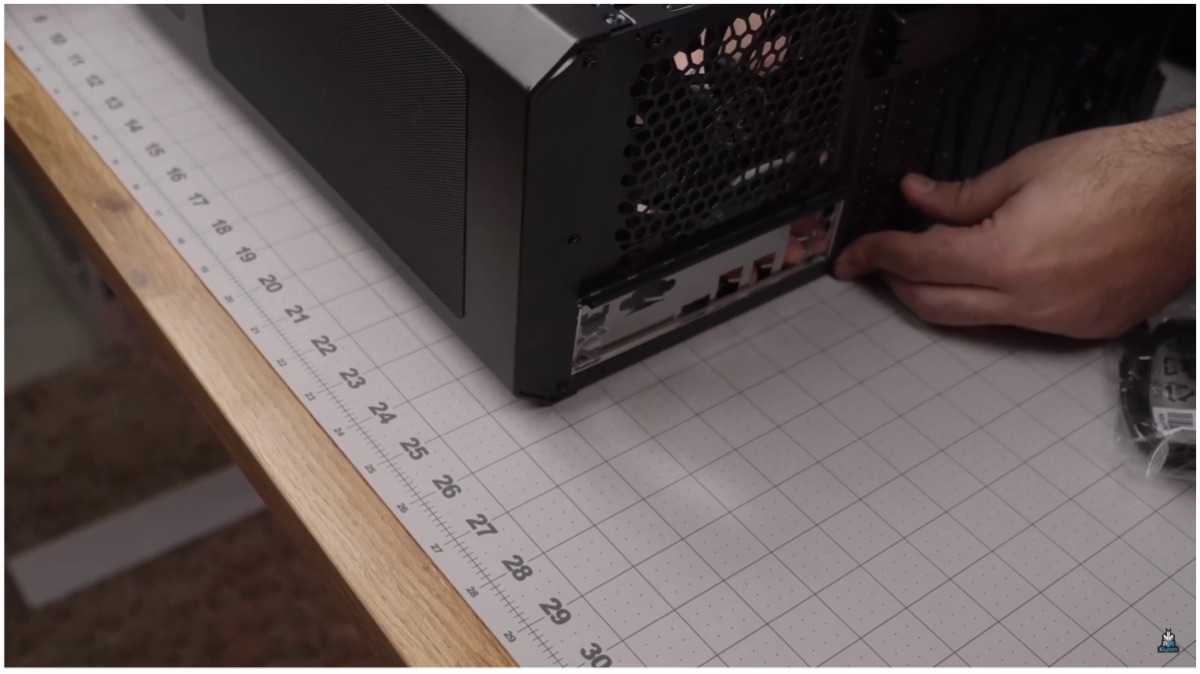
Step 1: Install the PSU after opening up the Antec NX200 case, the Thermaltake 450W PSU will be installed first (always use a renowned brand as PSU is a crucial component). Do remember to always safely store screws while building or opening a PC. The bottom part of the case houses an area specifically for the power supply unit and we will start from there.
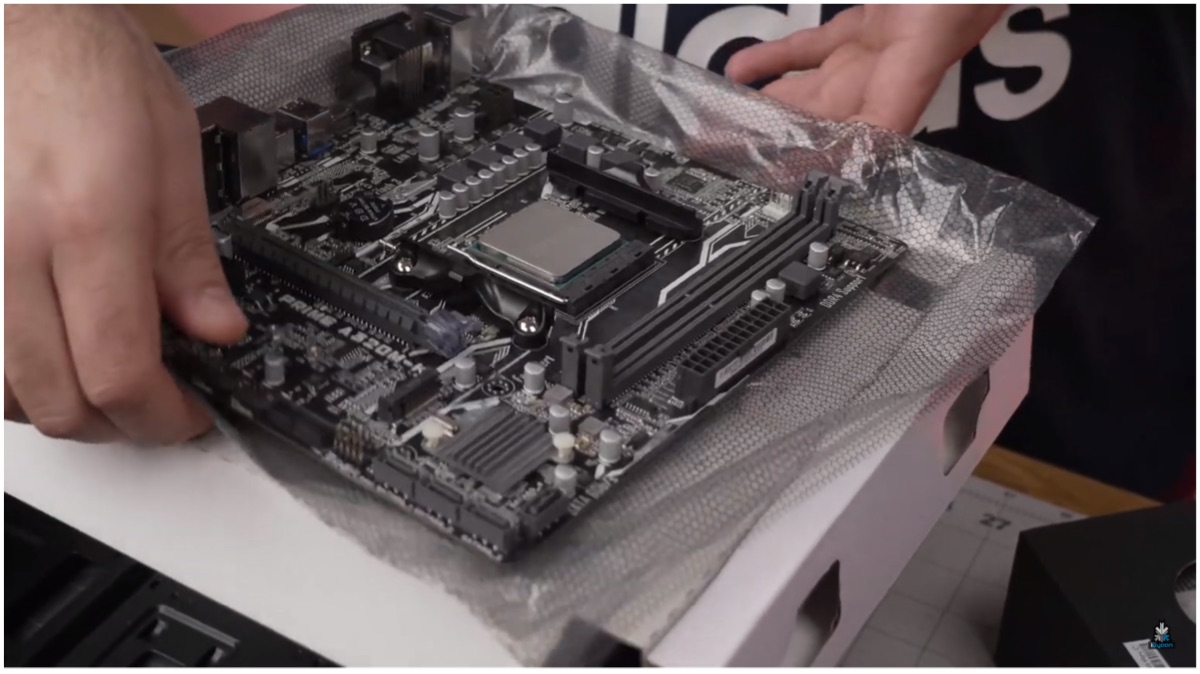
Step 2: Now, we ready the motherboard before outfitting it onto the case. The Asus A320 AM4 compatible motherboard is perfect for the Ryzen 3200G. To install the APU, lift the lever before placing the chipset. Now, an arrow can be found on both the CPU and motherboard that must be aligned to ensure proper fitting. Pull the lever down again to lock in the CPU.
Step 3: The A320 has 6 total standoffs holes which can be used to safely mount the motherboard onto the case. The case only offers four standoffs pre-installed but offer additional screws that make it possible to place two more. Make sure to have the standoffs at the same height lest the motherboard bends and gets damaged.

Step 4: Place the IO shield on the backplate. It is a metallic slate which can be fitted into the backplate. Once you place the motherboard, the IO shield should have ports from the board that align perfectly with its holes. Now, use a screwdriver to ensure a secure fit of the motherboard onto the case and make sure not to overtighten the screws.
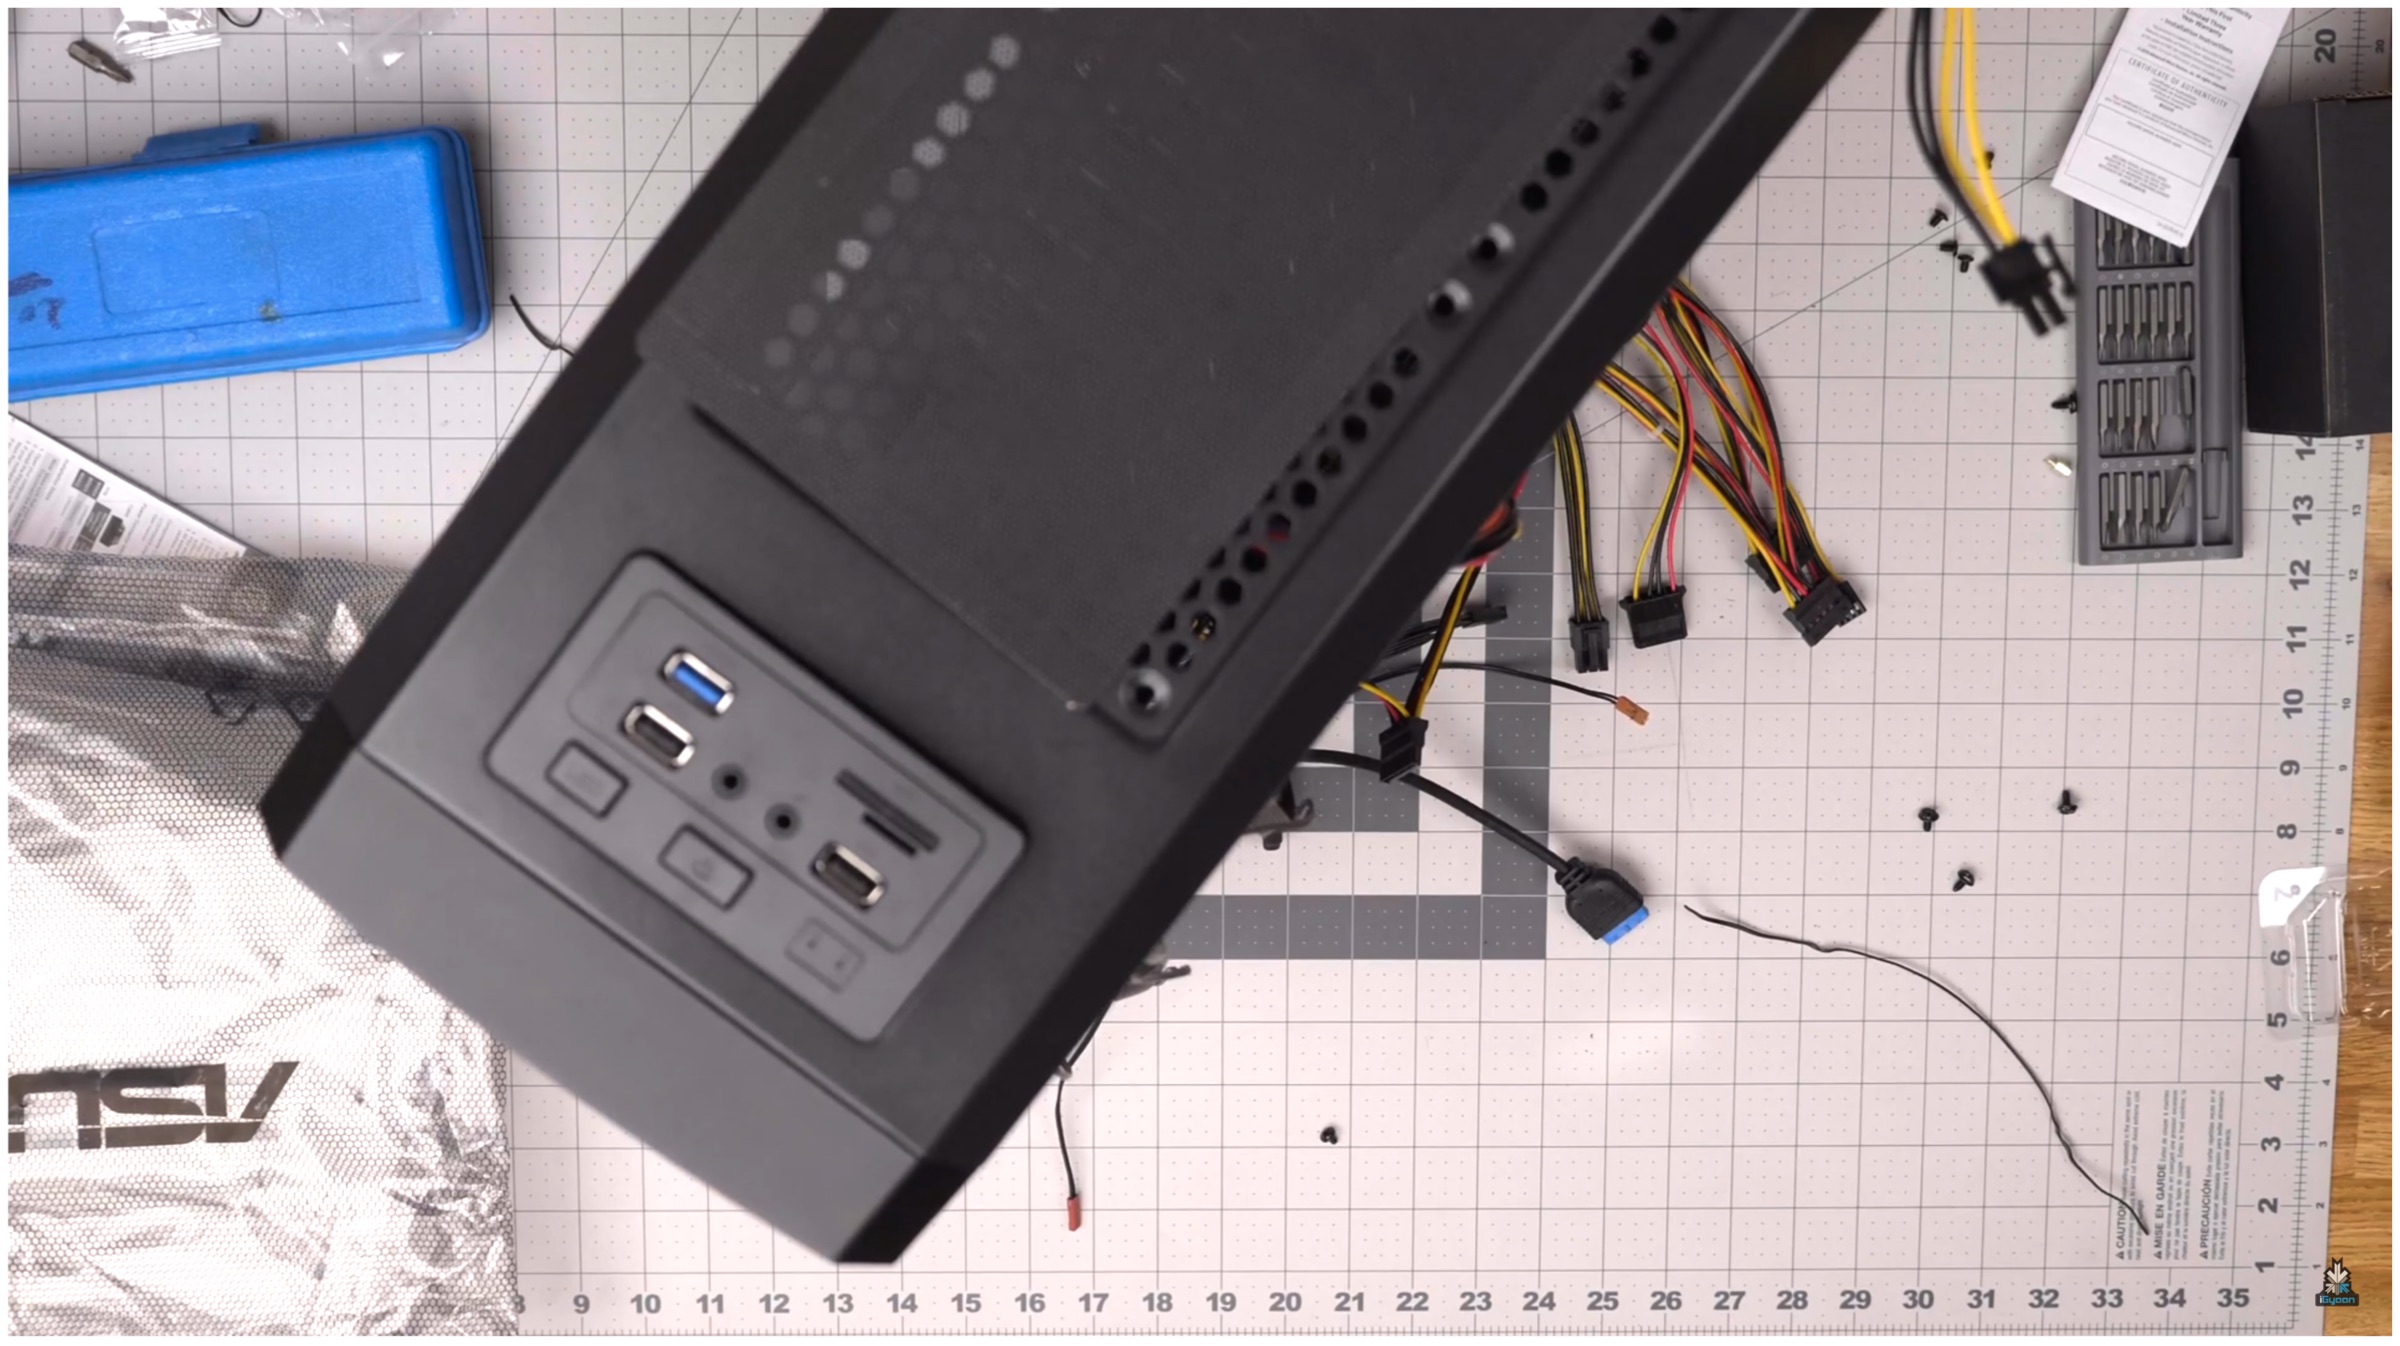
Step 5: Install the RAM according to the slot. DIMM A1 is the first slot and where the 8GB Crucial RAM should be fitted. You should hear a click once it is housed properly. After this is done flip the case to route the cable and equip the build with the SSD. After opening the side panel users can use the screws provided to fit the 480GB Crucial SSD into place.
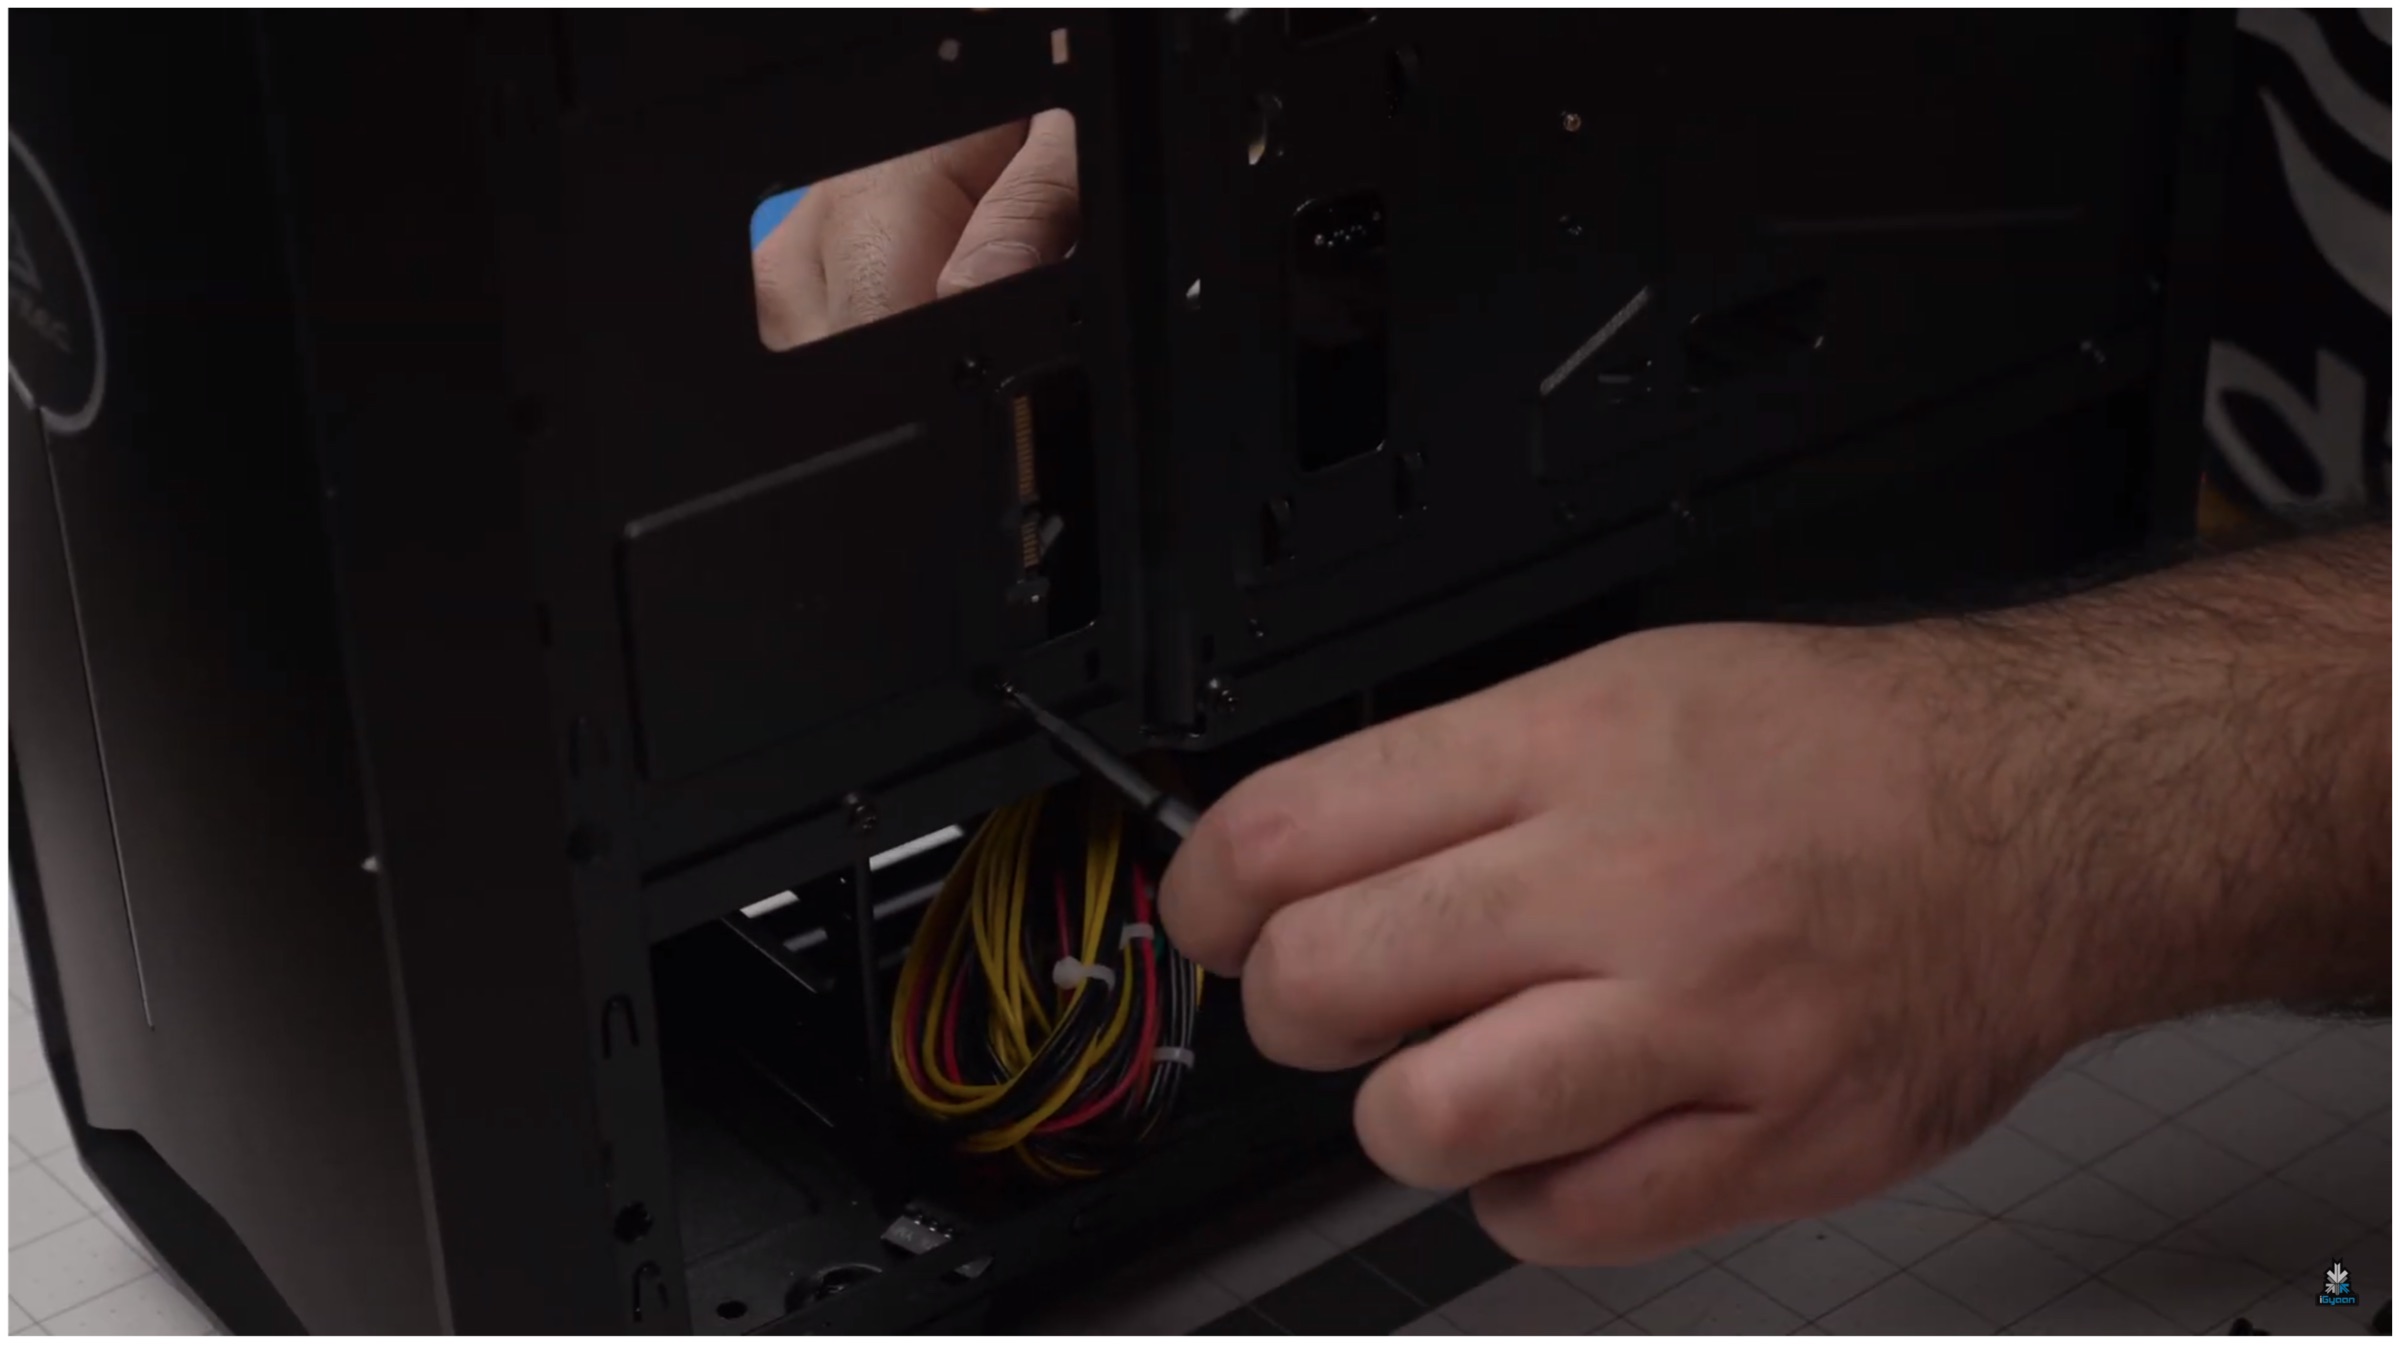
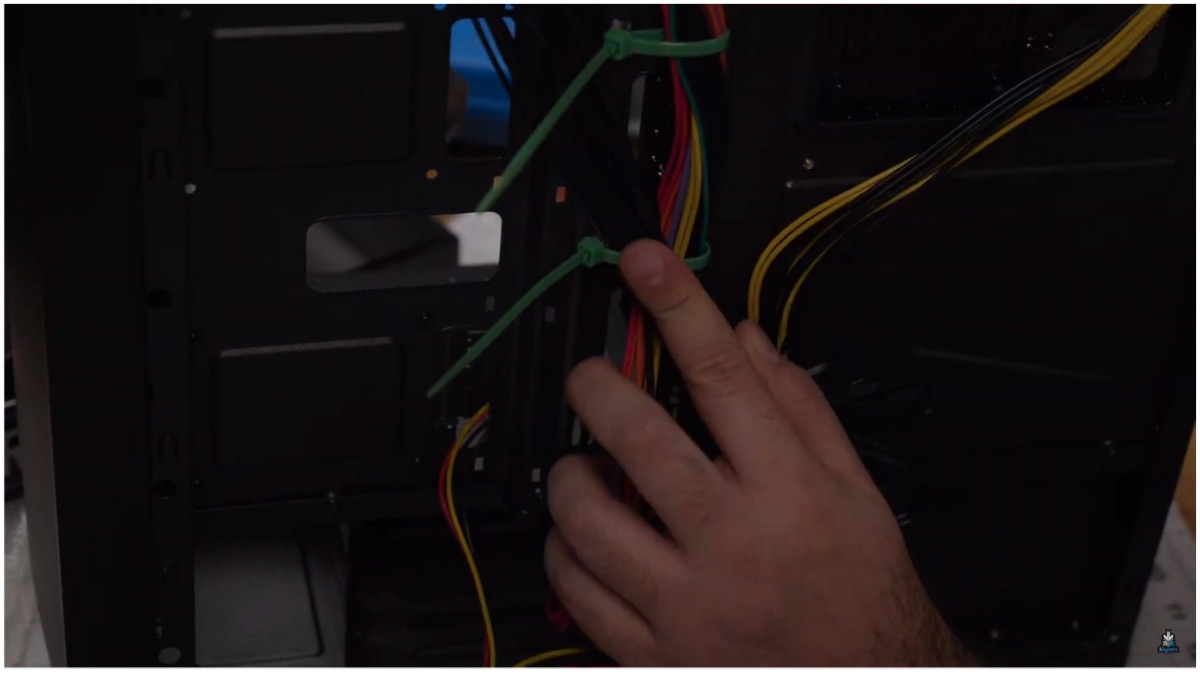
Step 6: Cable management is always important. We used the cases inbuilt routes to ensure better cable management with wires being less evident from the clear side of the build. Users can take each cable out from the side panel. It is required to connect necessary cables, like the power cable, after being routed from the back. Users should check to see which pins the cable align with to know where to connect the plugs. For example, HD Audio connects to the audio connector. Like the LED power connectors, Always check the motherboard that has markings which define what each pin is made for.
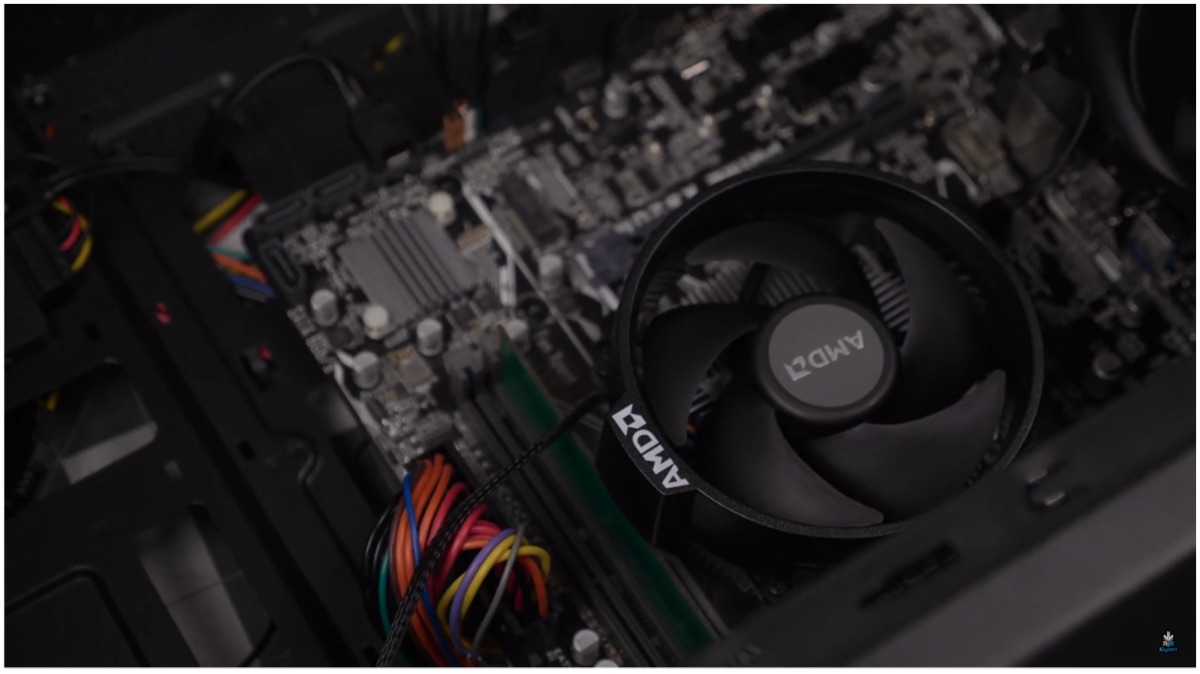
Step 7: To keep the CPU cool, users need to install the Wraith Fan from AMD. Take the cable from the back before plugging, it is similar to what we have previously done with the other wires. This hides most of the wires to the back of the PC build. The CPU cooling fan has thermal paste pre-applied which can be cleaned and switched but we recommend using the stock. Remove the mounting brackets that are pre-installed on the flanks of the CPU unit, these are not required in our build.
Make sure to hold onto the plates that are co-joined with the brackets from the opposite side and screw it along with the fan. In our initial attempt, we had the fan come into contact with the RAM. To fix the issue we rotated the fan bracket right way up to avoid the problem by loosening 4 screws on the fan itself and tightening it back again.
The build is more or less done considering we don’t have to worry about a GPU or additional SSD. The case has space for added cooling via more fan units or even water cooling if users wish to upgrade in the future. The build isn’t complete before we can secure every cable and close up the case; so do check our video to see how we used ties to group the cables neatly before tucking them in.
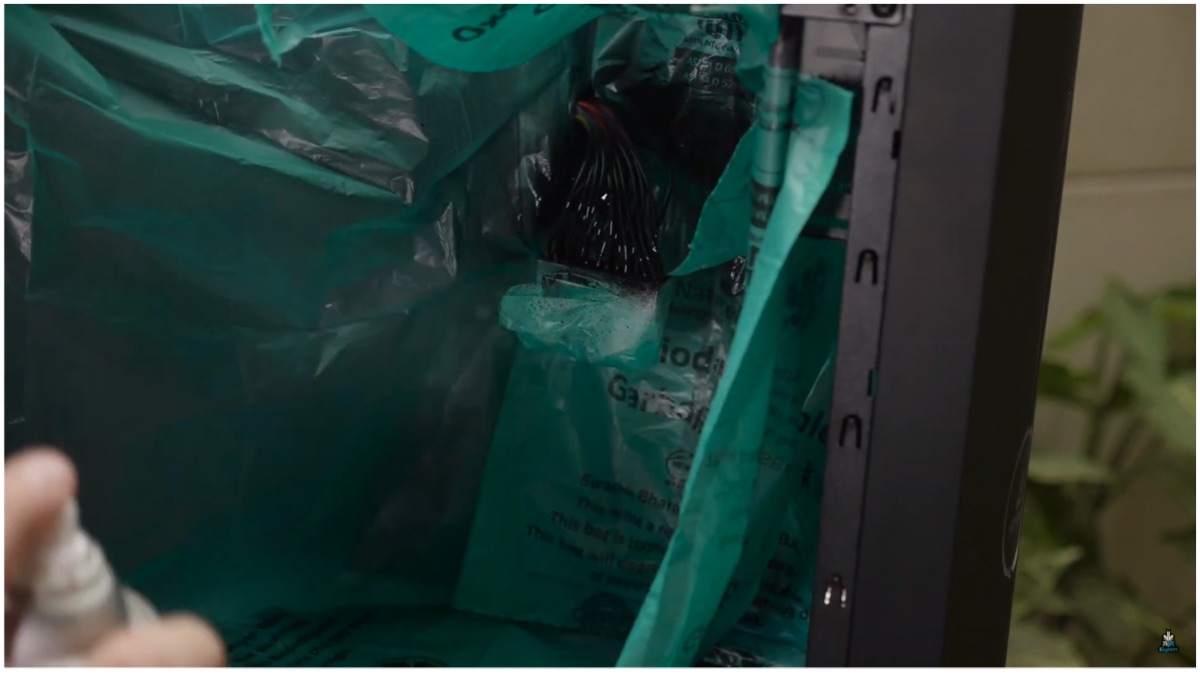
Step 8 (Optional): For aesthetics, we also included an LED strip whose power had to be routed through the back to power it up. After the Windows installation was complete we decided to spray paint the red and mustard colour cables that seemed distracting. It was achieved without spending additional money and we went spraying to finally achieve the look we were after.
Performance & Conclusion
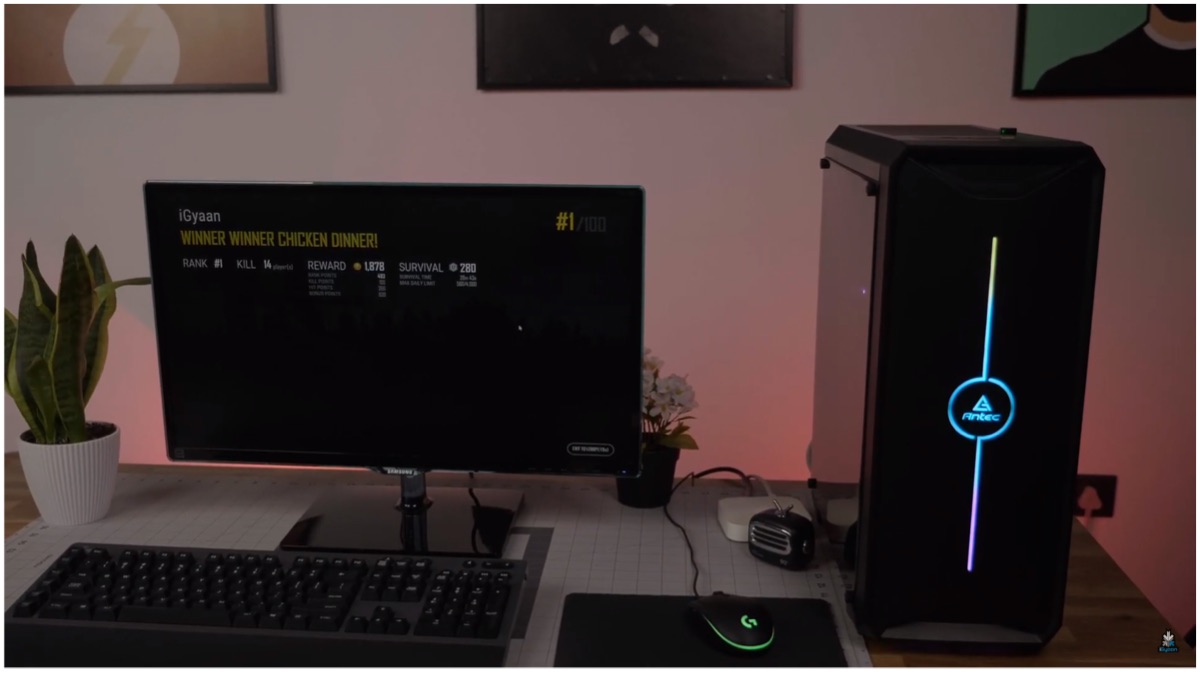
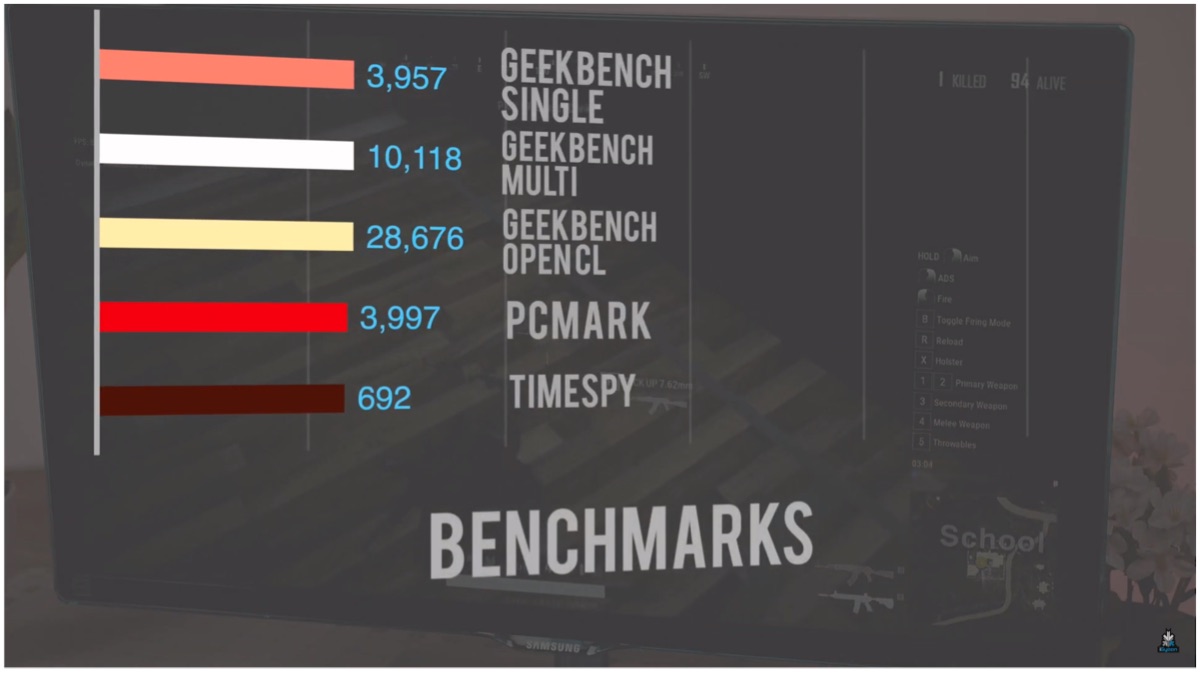
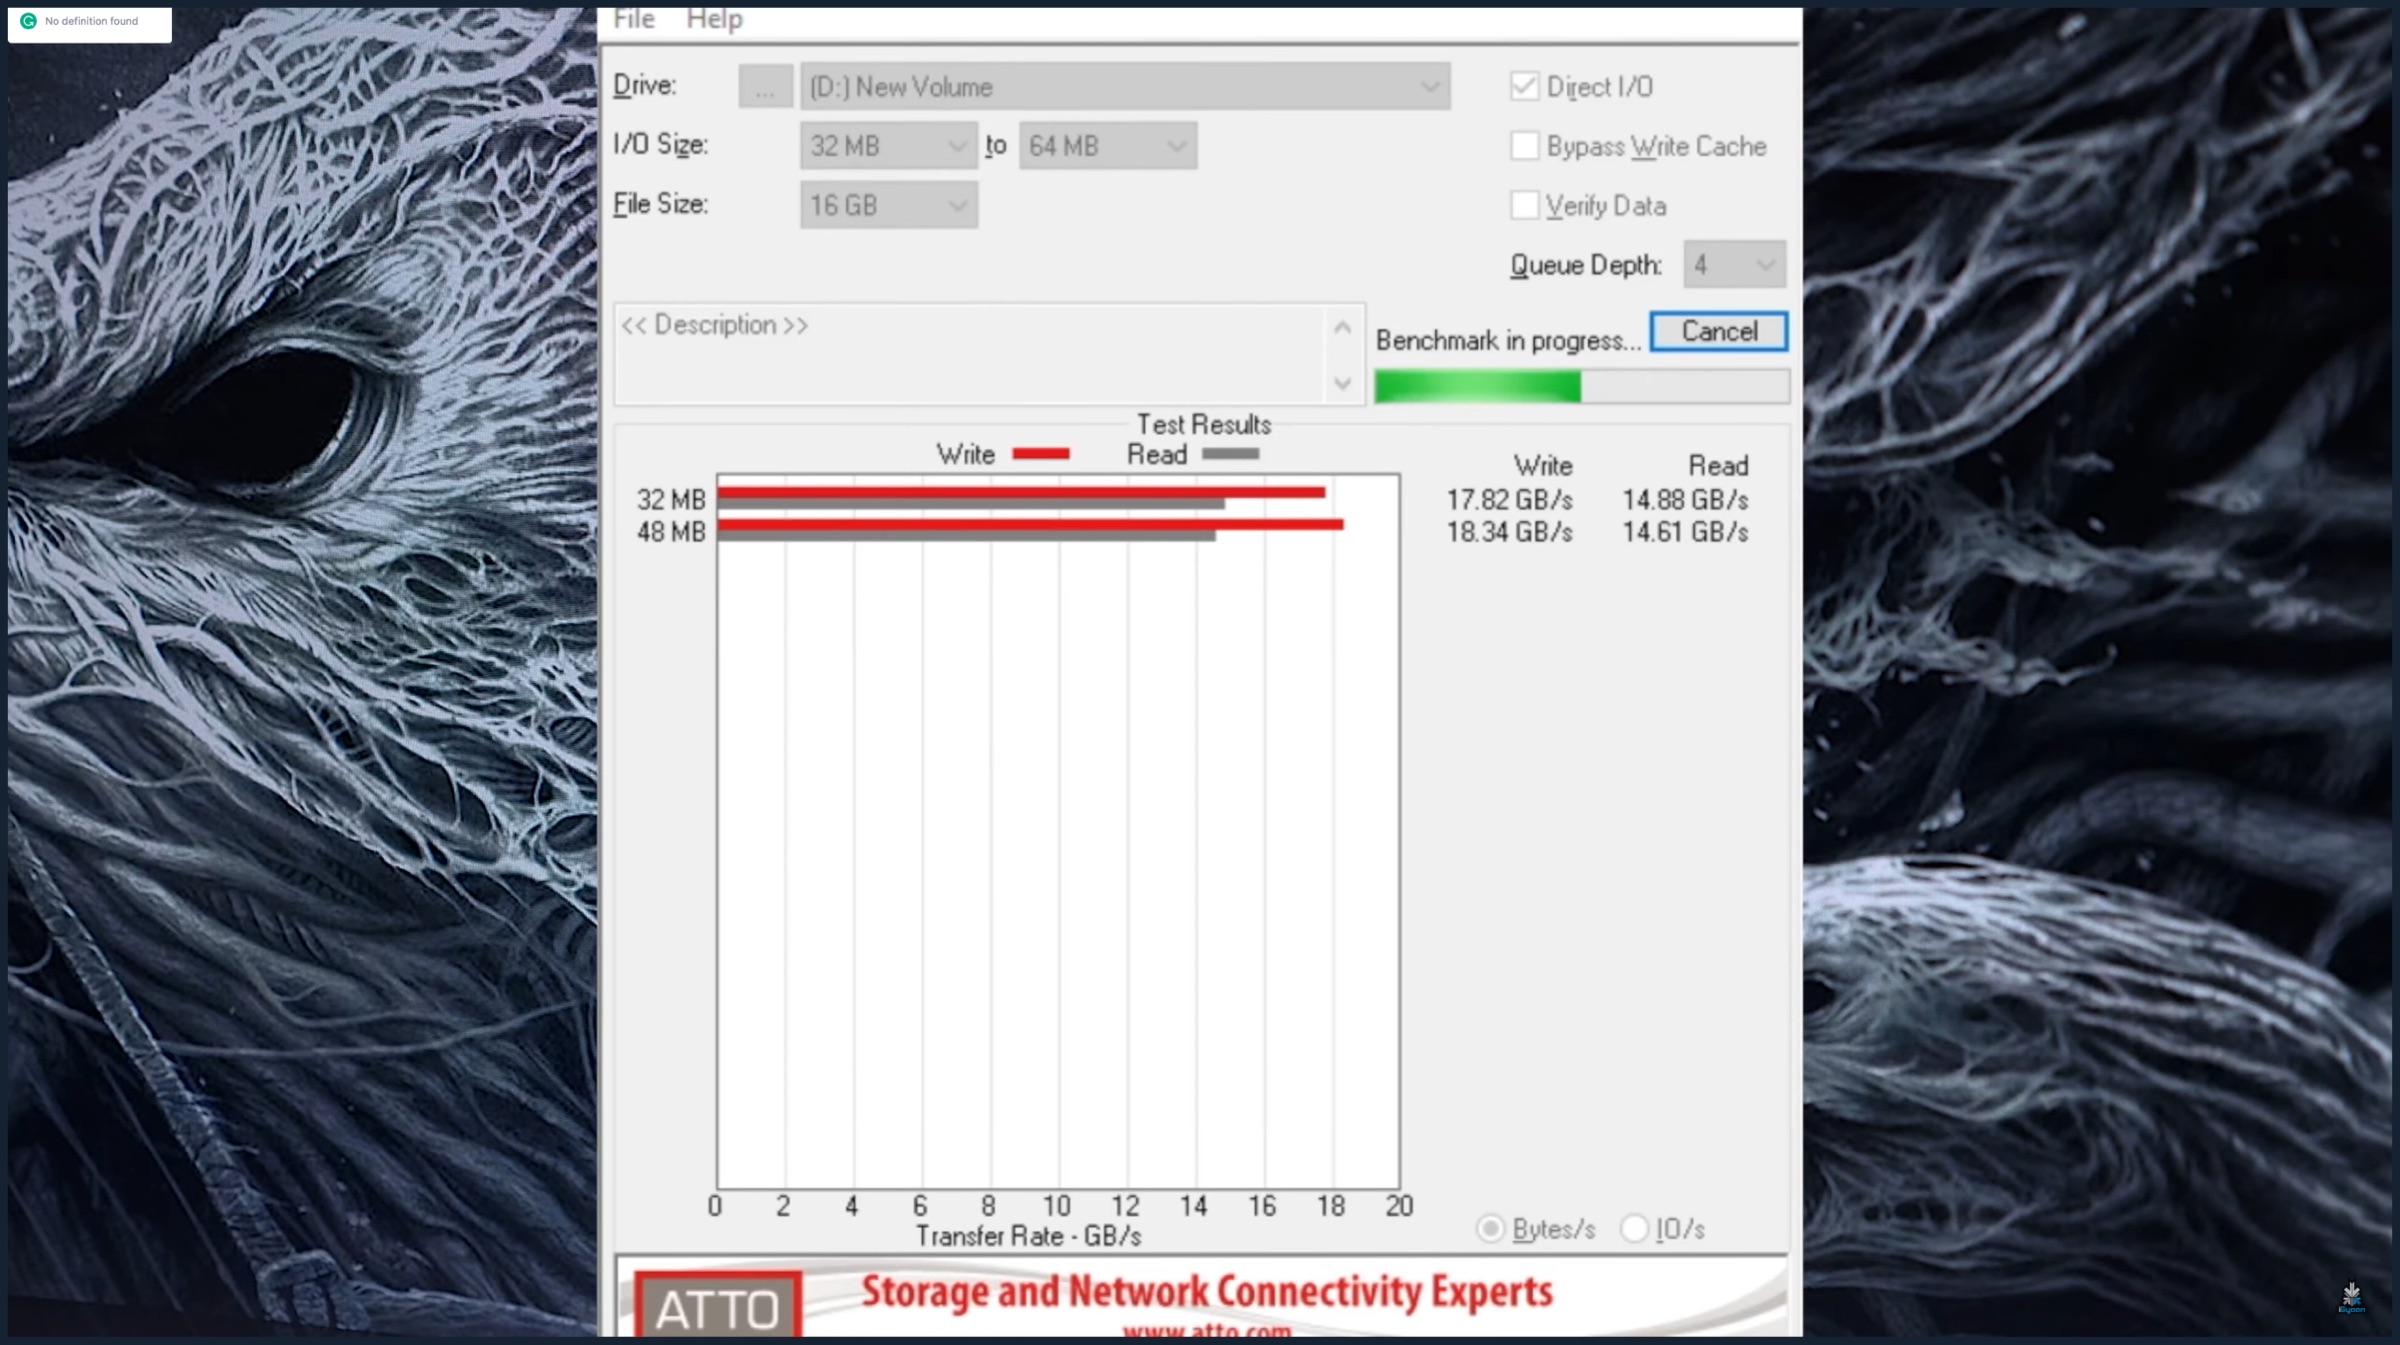
In games like PUBG Lite and GTA V, we achieved frame rates between 50-60fps after tweaking some settings. The budget PC is capable of running other popular games like CS:GO, Apex Legends and even DOTA 2 as well. It is a long shot to claim you can play the latest AAA titles but most classic to even certain new games run well at the lowest settings. You can also look at the chart below to discern the synthetic benchmark of the PC.
Also Read: Redmi K20 Lineup Will Receive A Price Cut From 1st August
For visual assistance, while building your own setup, you can refer to our video on the official iGyaan Network YouTube channel. The video offers a much more in-depth look with visual cues as to how to go about certain complex portions such as cable routing or management. Do follow us on social media for more PC and gaming related content and stay tuned for more.

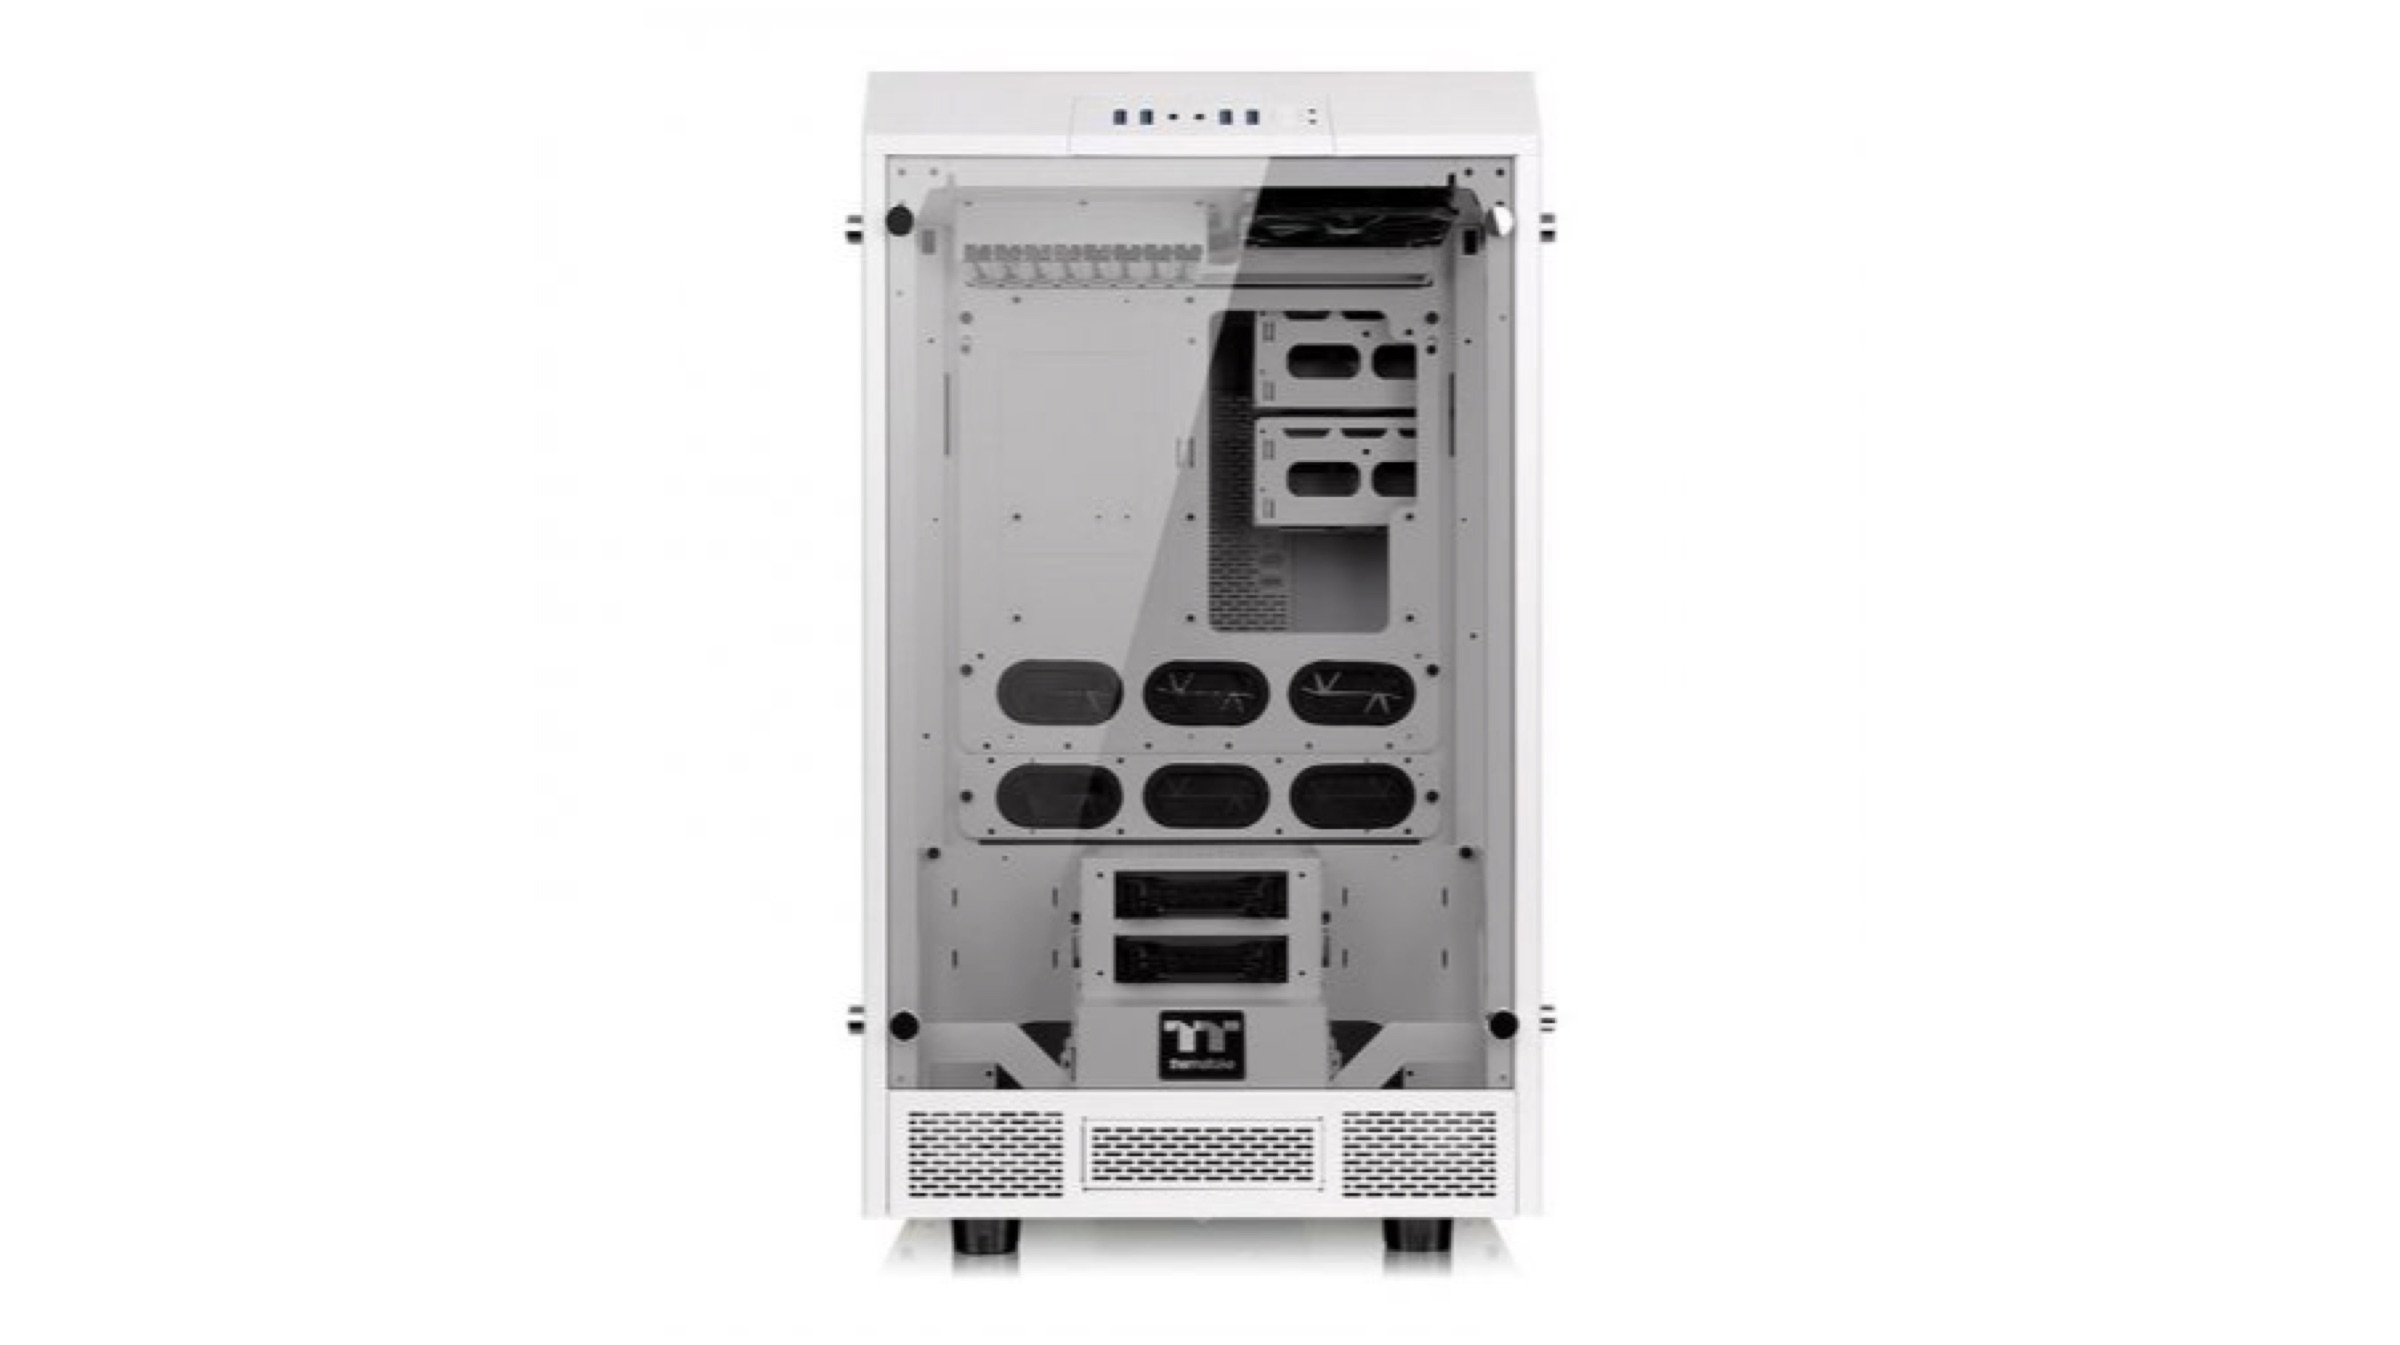 The Thermaltake Tower 900 was a great choice for the build as it has a vertically mounted design, which can easily accommodate two cooling pumps. It is adorned on three sides with Tempered glass, so we can clearly showcase all the components on the build from multiple angles. Plus, the tower has a lot of expansion space, so if we decide to add more components in the future, it won’t be a hassle at all. It has an adequate amount of airflow and cable routing space for management. On top of everything, the white colour looks absolutely gorgeous and goes well with our black and white build theme.
 As we mentioned before, we had support for 128 gigs of RAM in our setup, so that’s what we did. We went for the Vengeance Pro 32GB modules, which had 2 sticks of 16GB RAM each. The memory modules are themselves quite aesthetically pleasing, with a white casing and RGB support. They have DDR4 memory and a clock speed of 3200 MHz per stick. The RGB lighting of the modules can be regulated with the help of Corsair’s iCUE application.
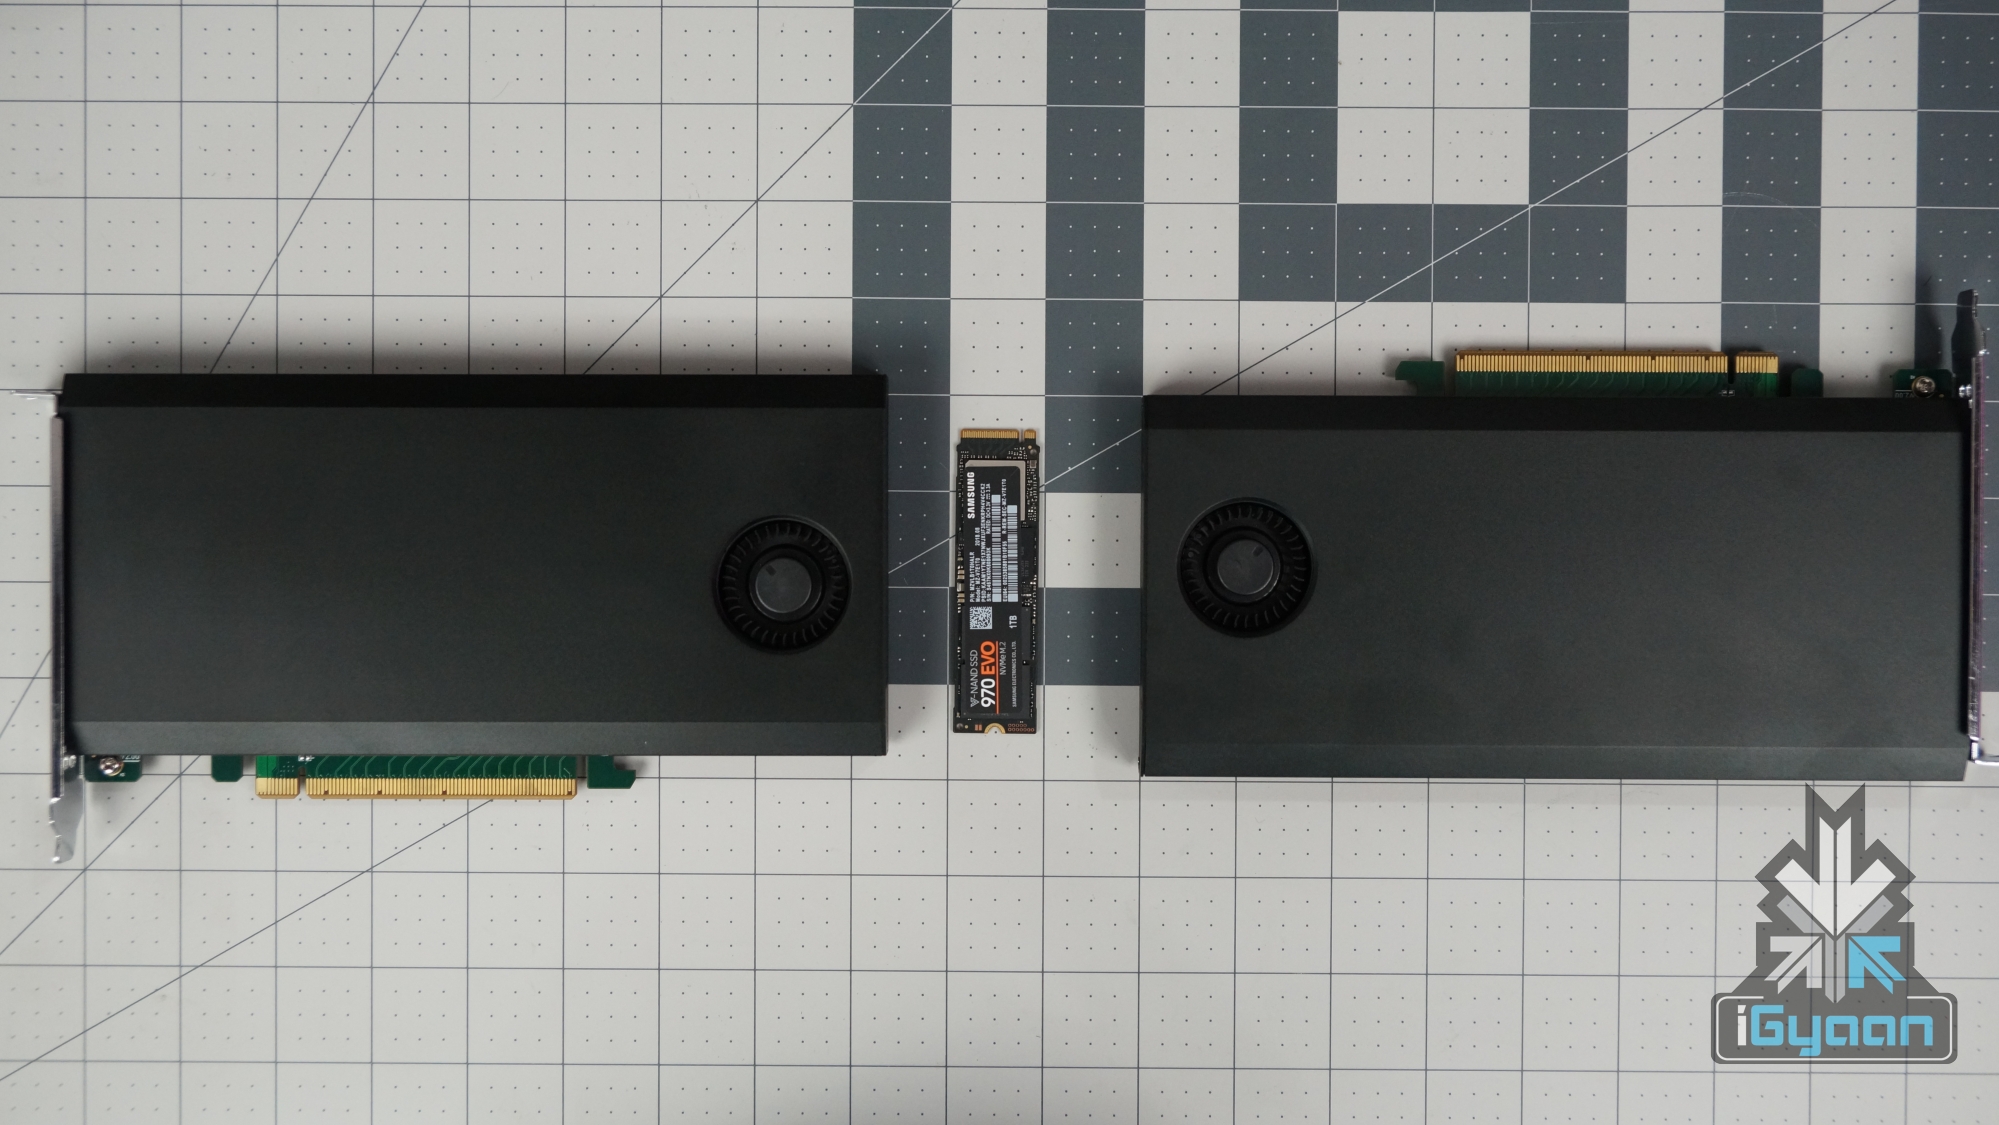
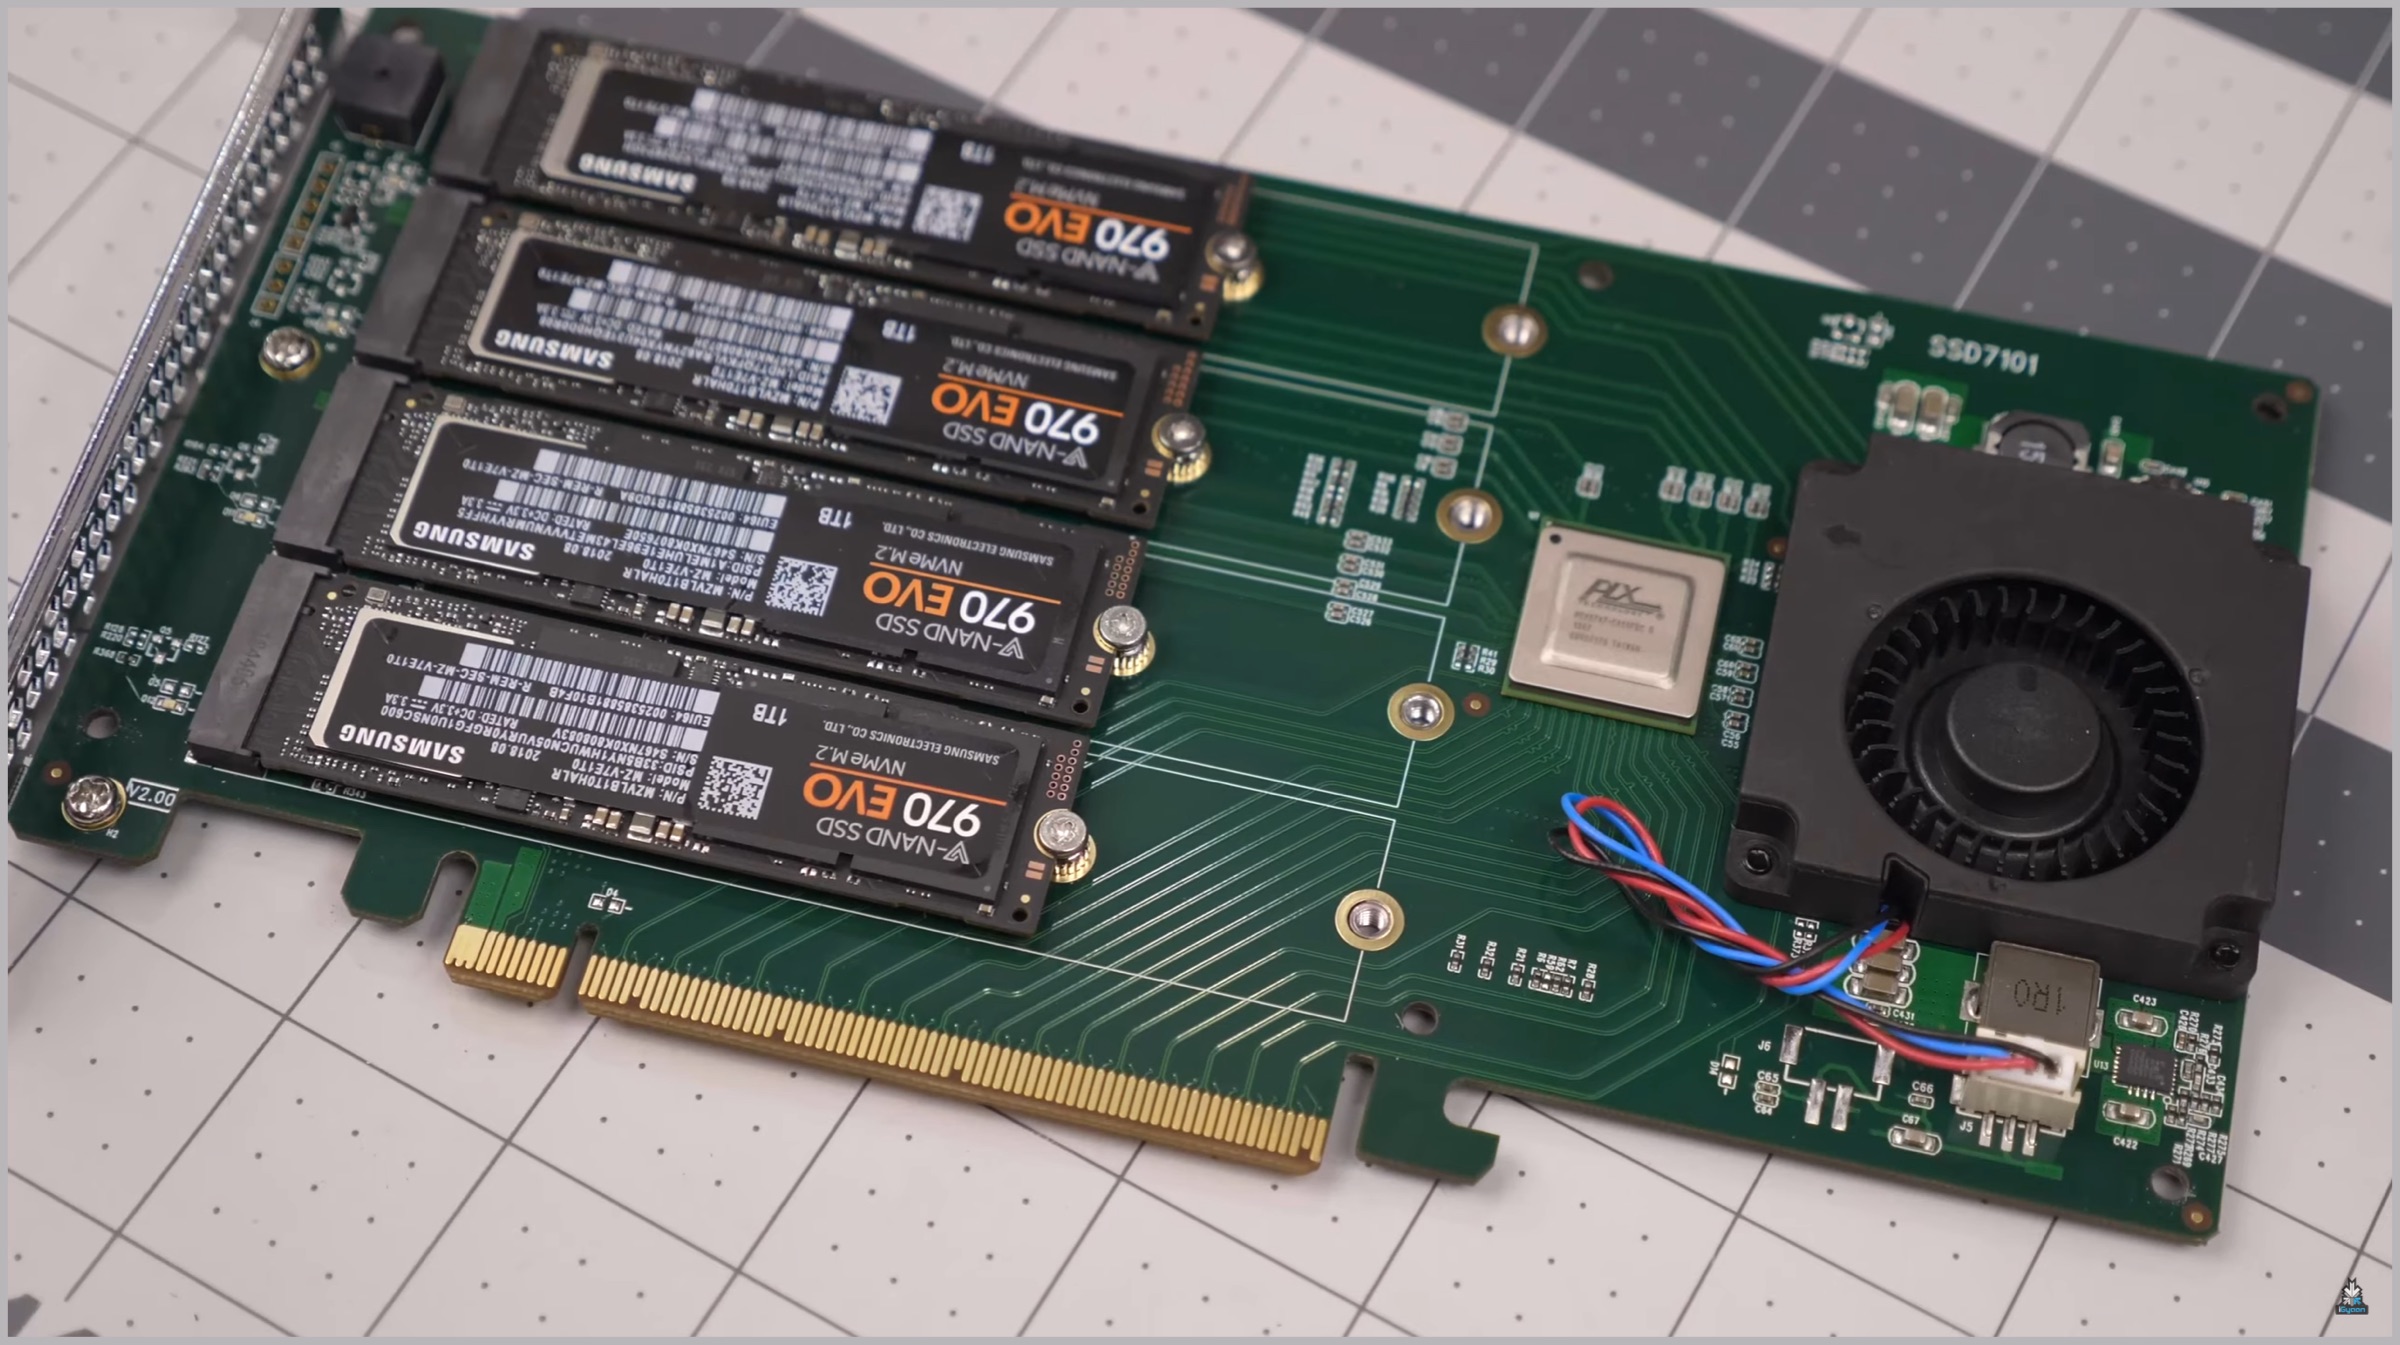
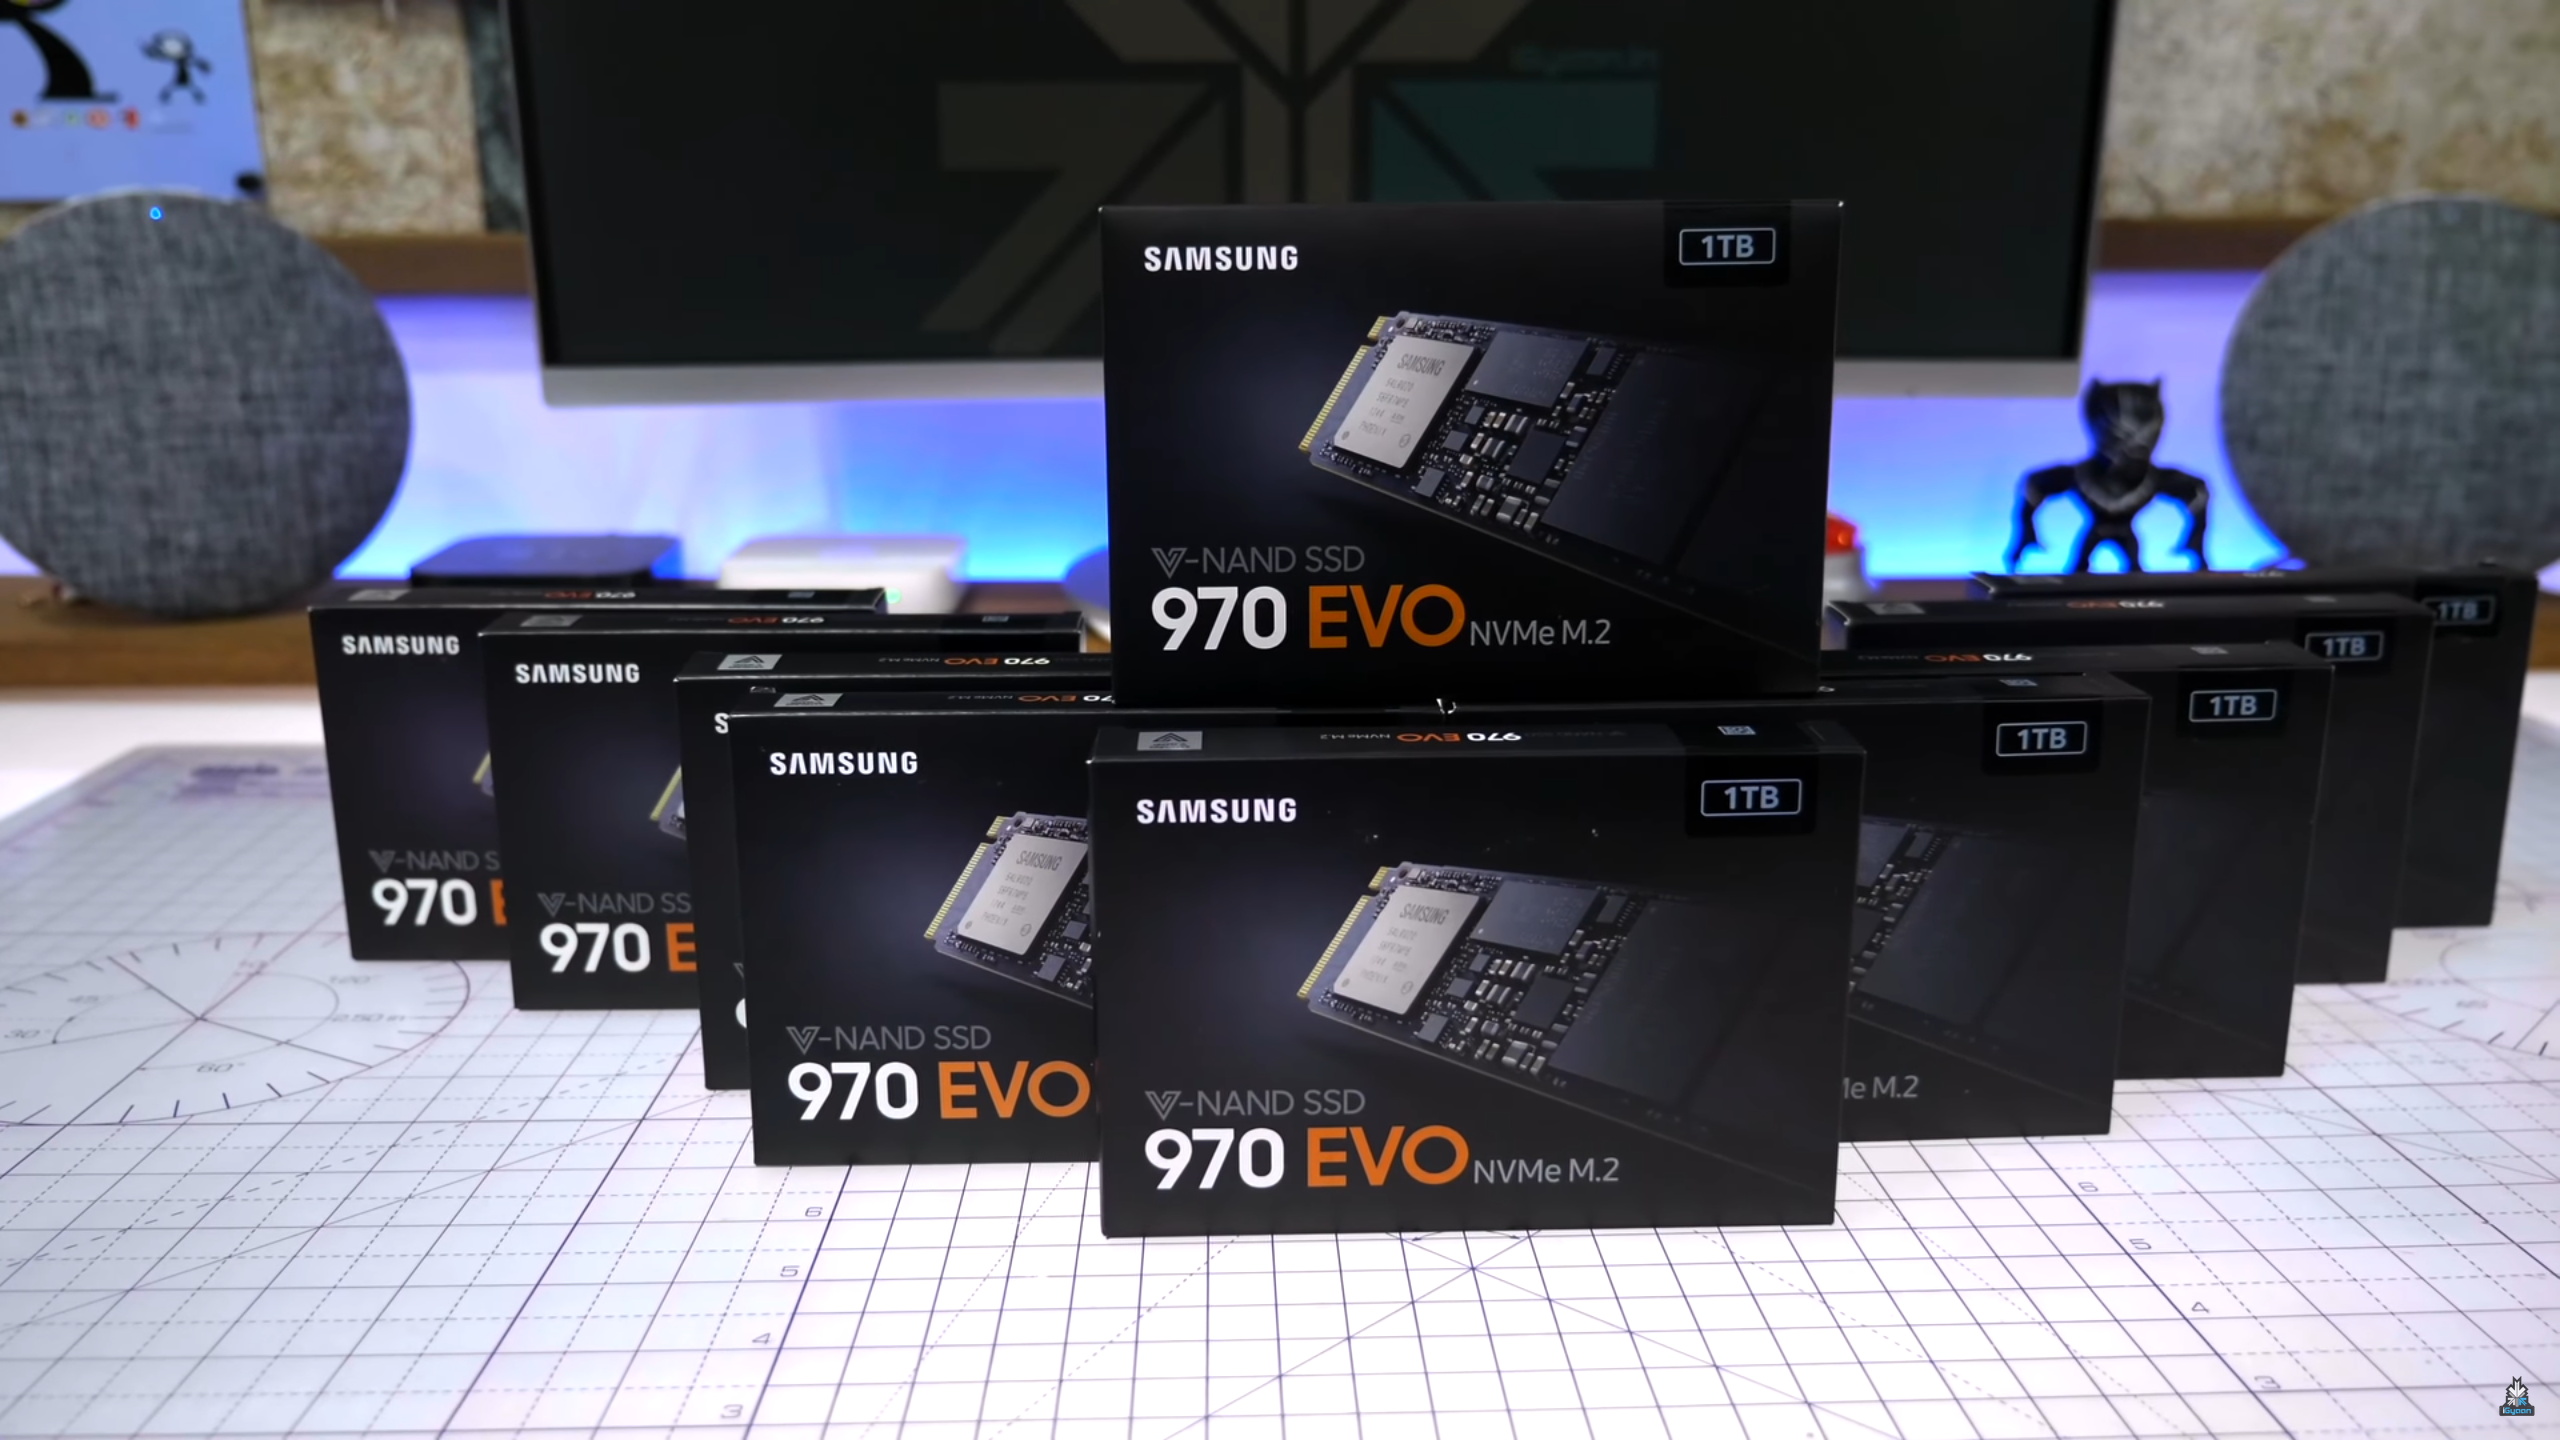
 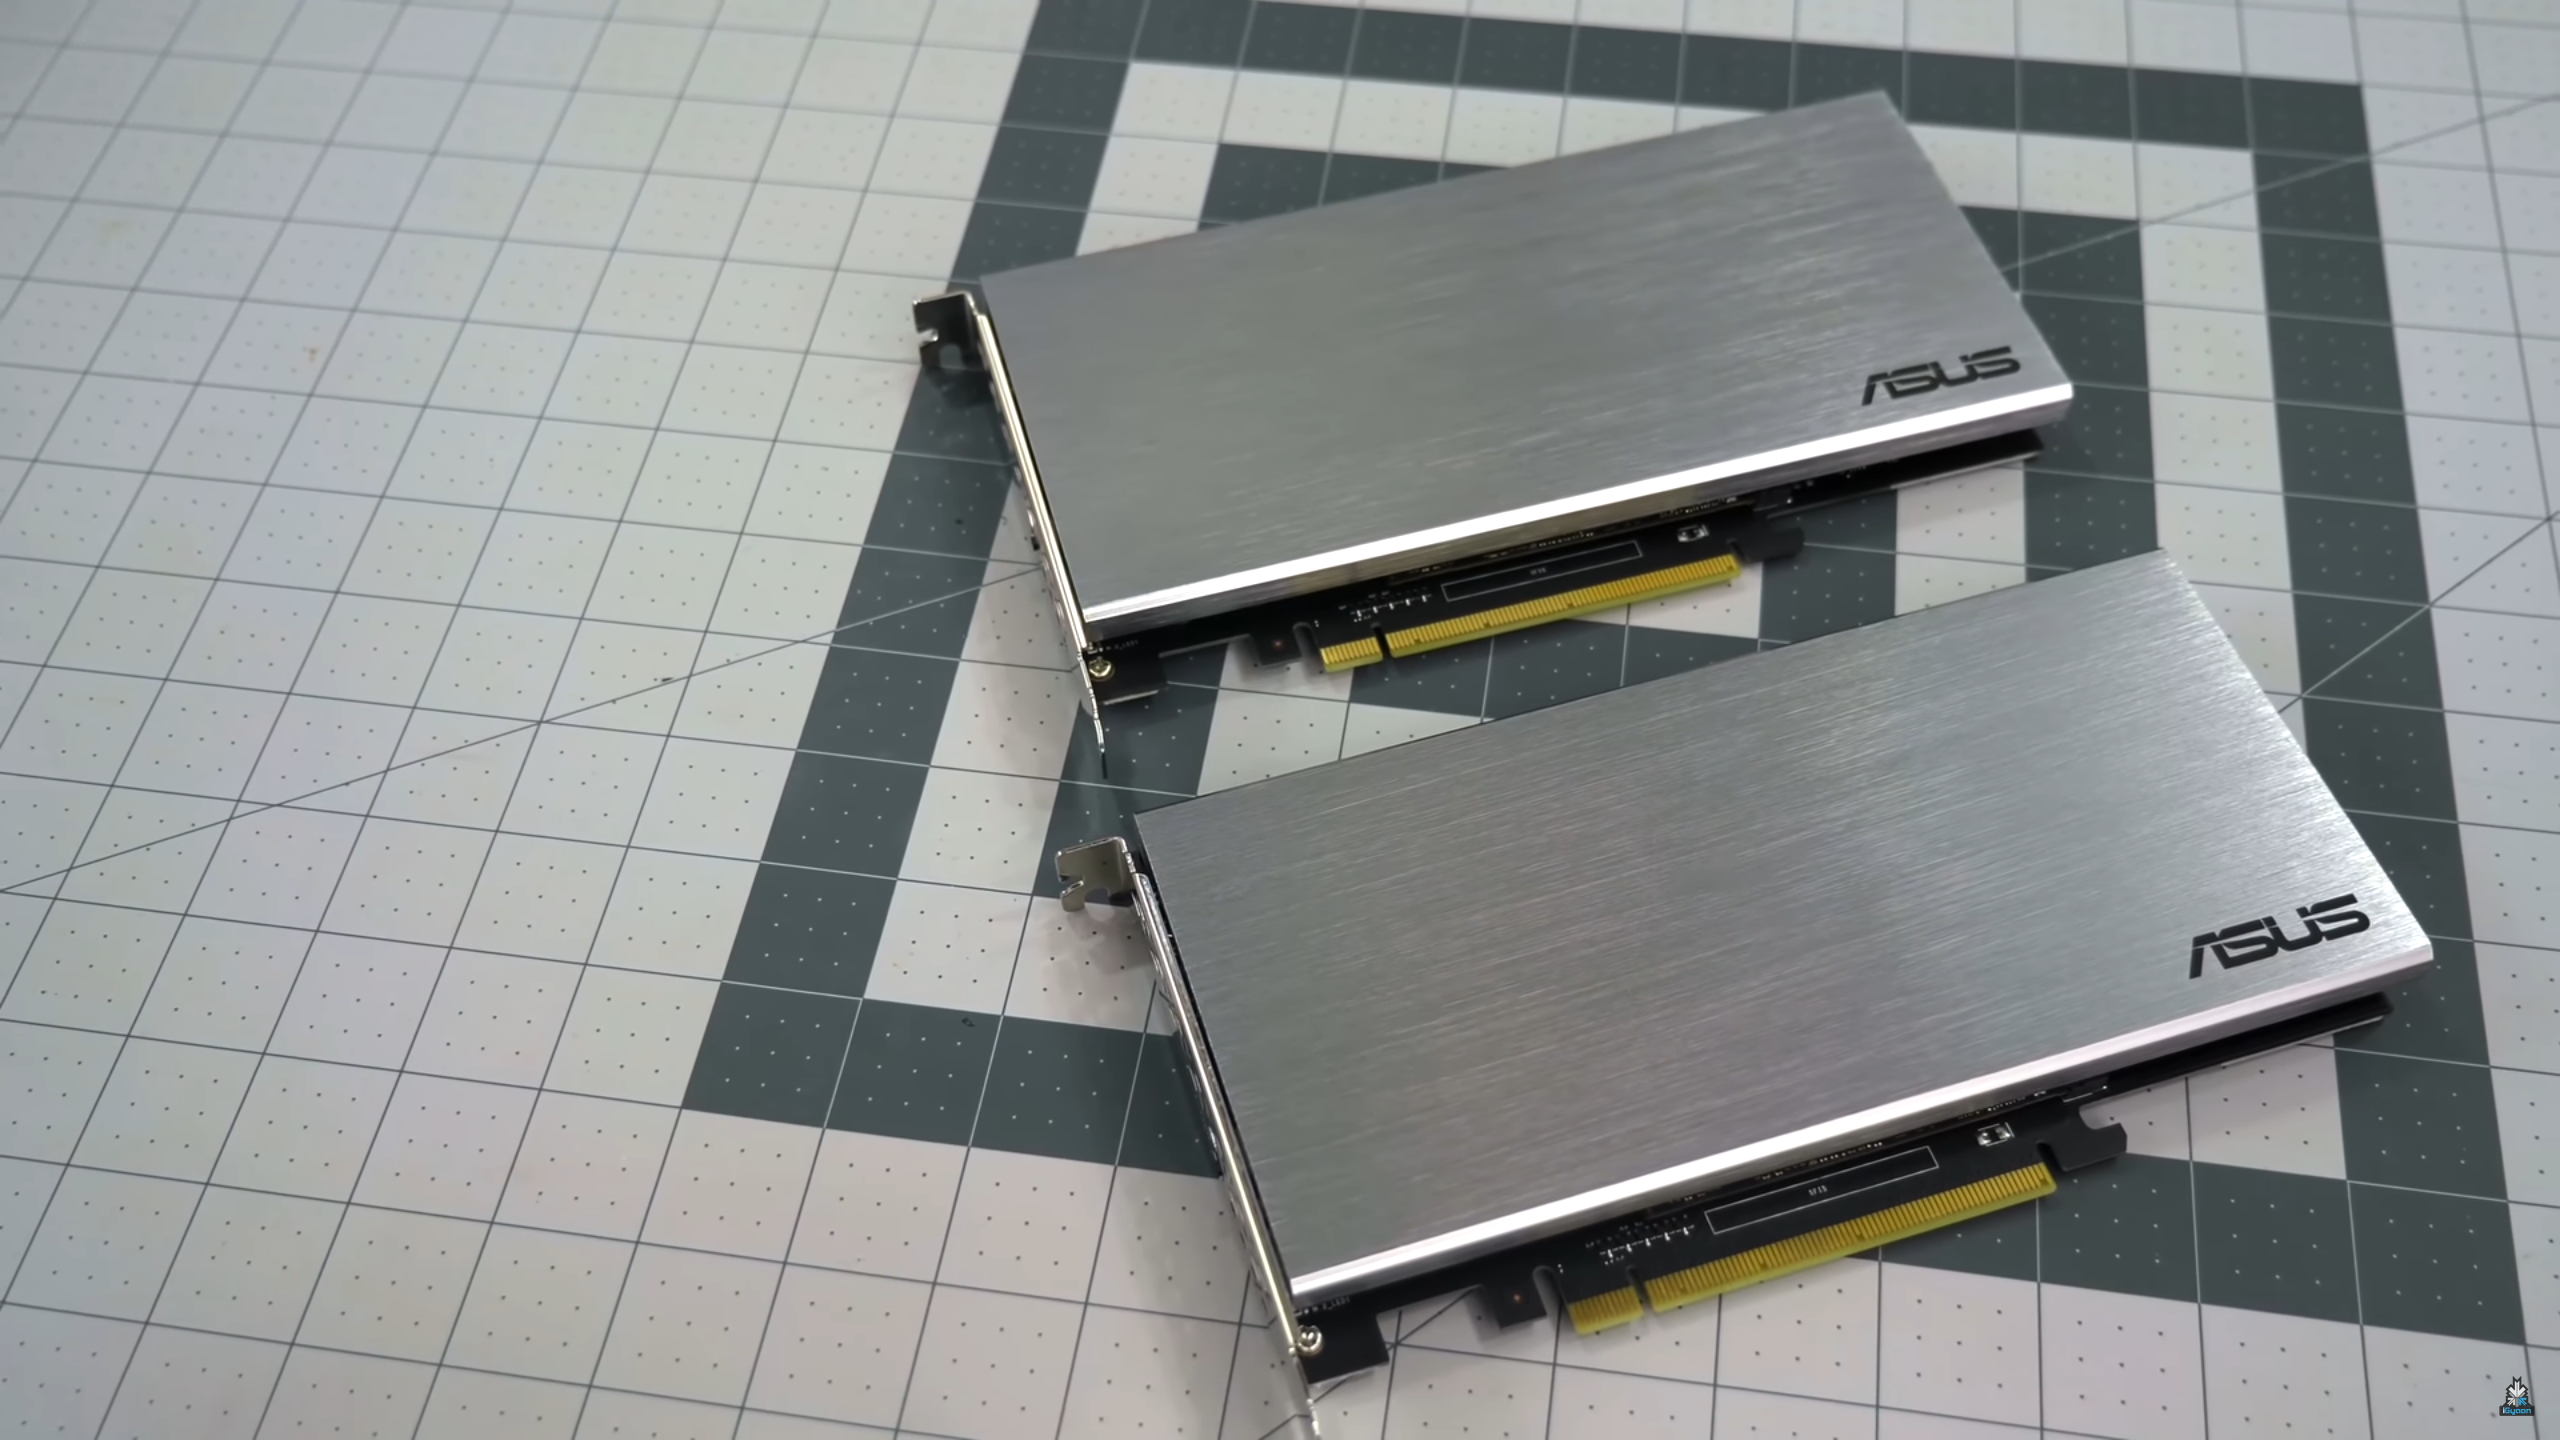 The ASUS Hyper M.2 x16 cards support 4 NVMe M.2 (2242/2260/2280/22110) SSDs each. They are specially designed for Intel VROC and AMD Ryzen Threadripper NVMe RAID setups. Moreover, it has an additional cooling fan inside the bay to ensure that the storage sticks don’t overheat.
 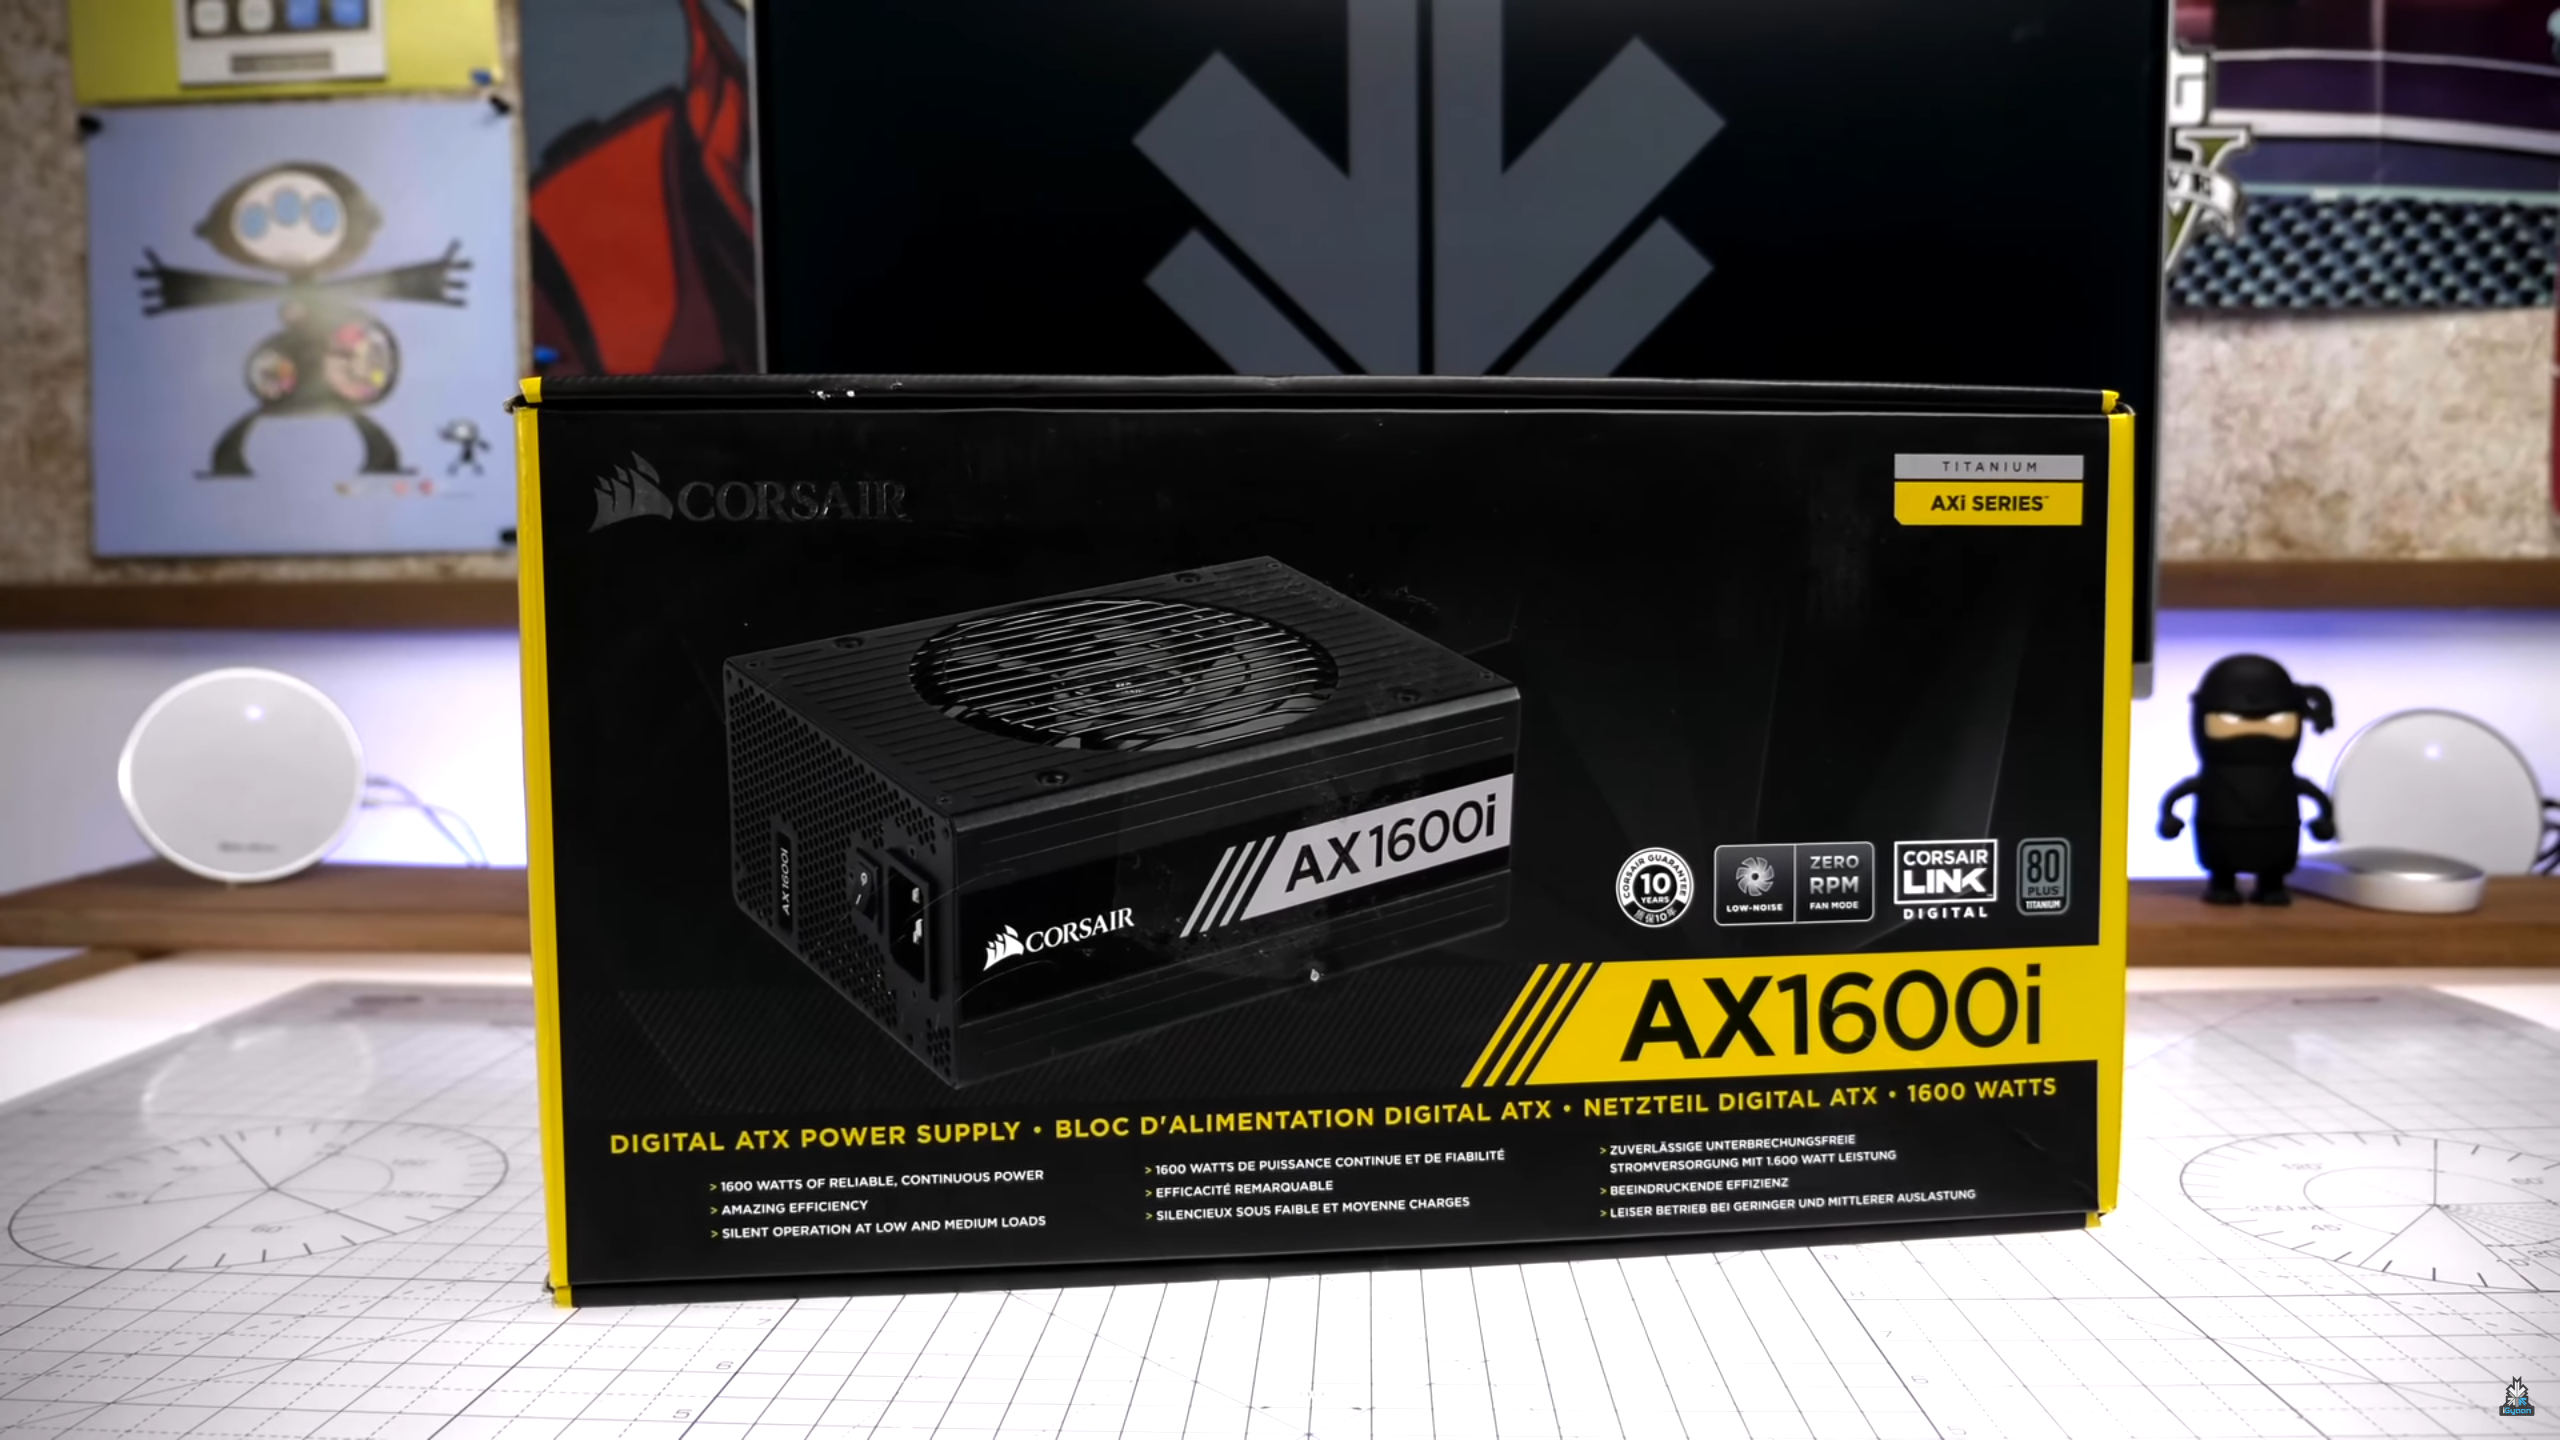 Owing to the sheer number and wattage of components being used in our build, we went for the Corsair AX1600i, which is titanium plus rated modular power supply unit. Its transistors are made out of Gallium Nitride instead of silicon, which ensures a lower resistance and faster switching. The fan speed of the PSU can be regulated with the help of the Corsair Link desktop application (users will have to connect the PSU to the system via a USB cable). Plus, the AX1600i claims to be one of the most silent PSUs in the market as of now. For the sake of our Black and White PC build, we decided to go for custom white Corsair cable sleeves.
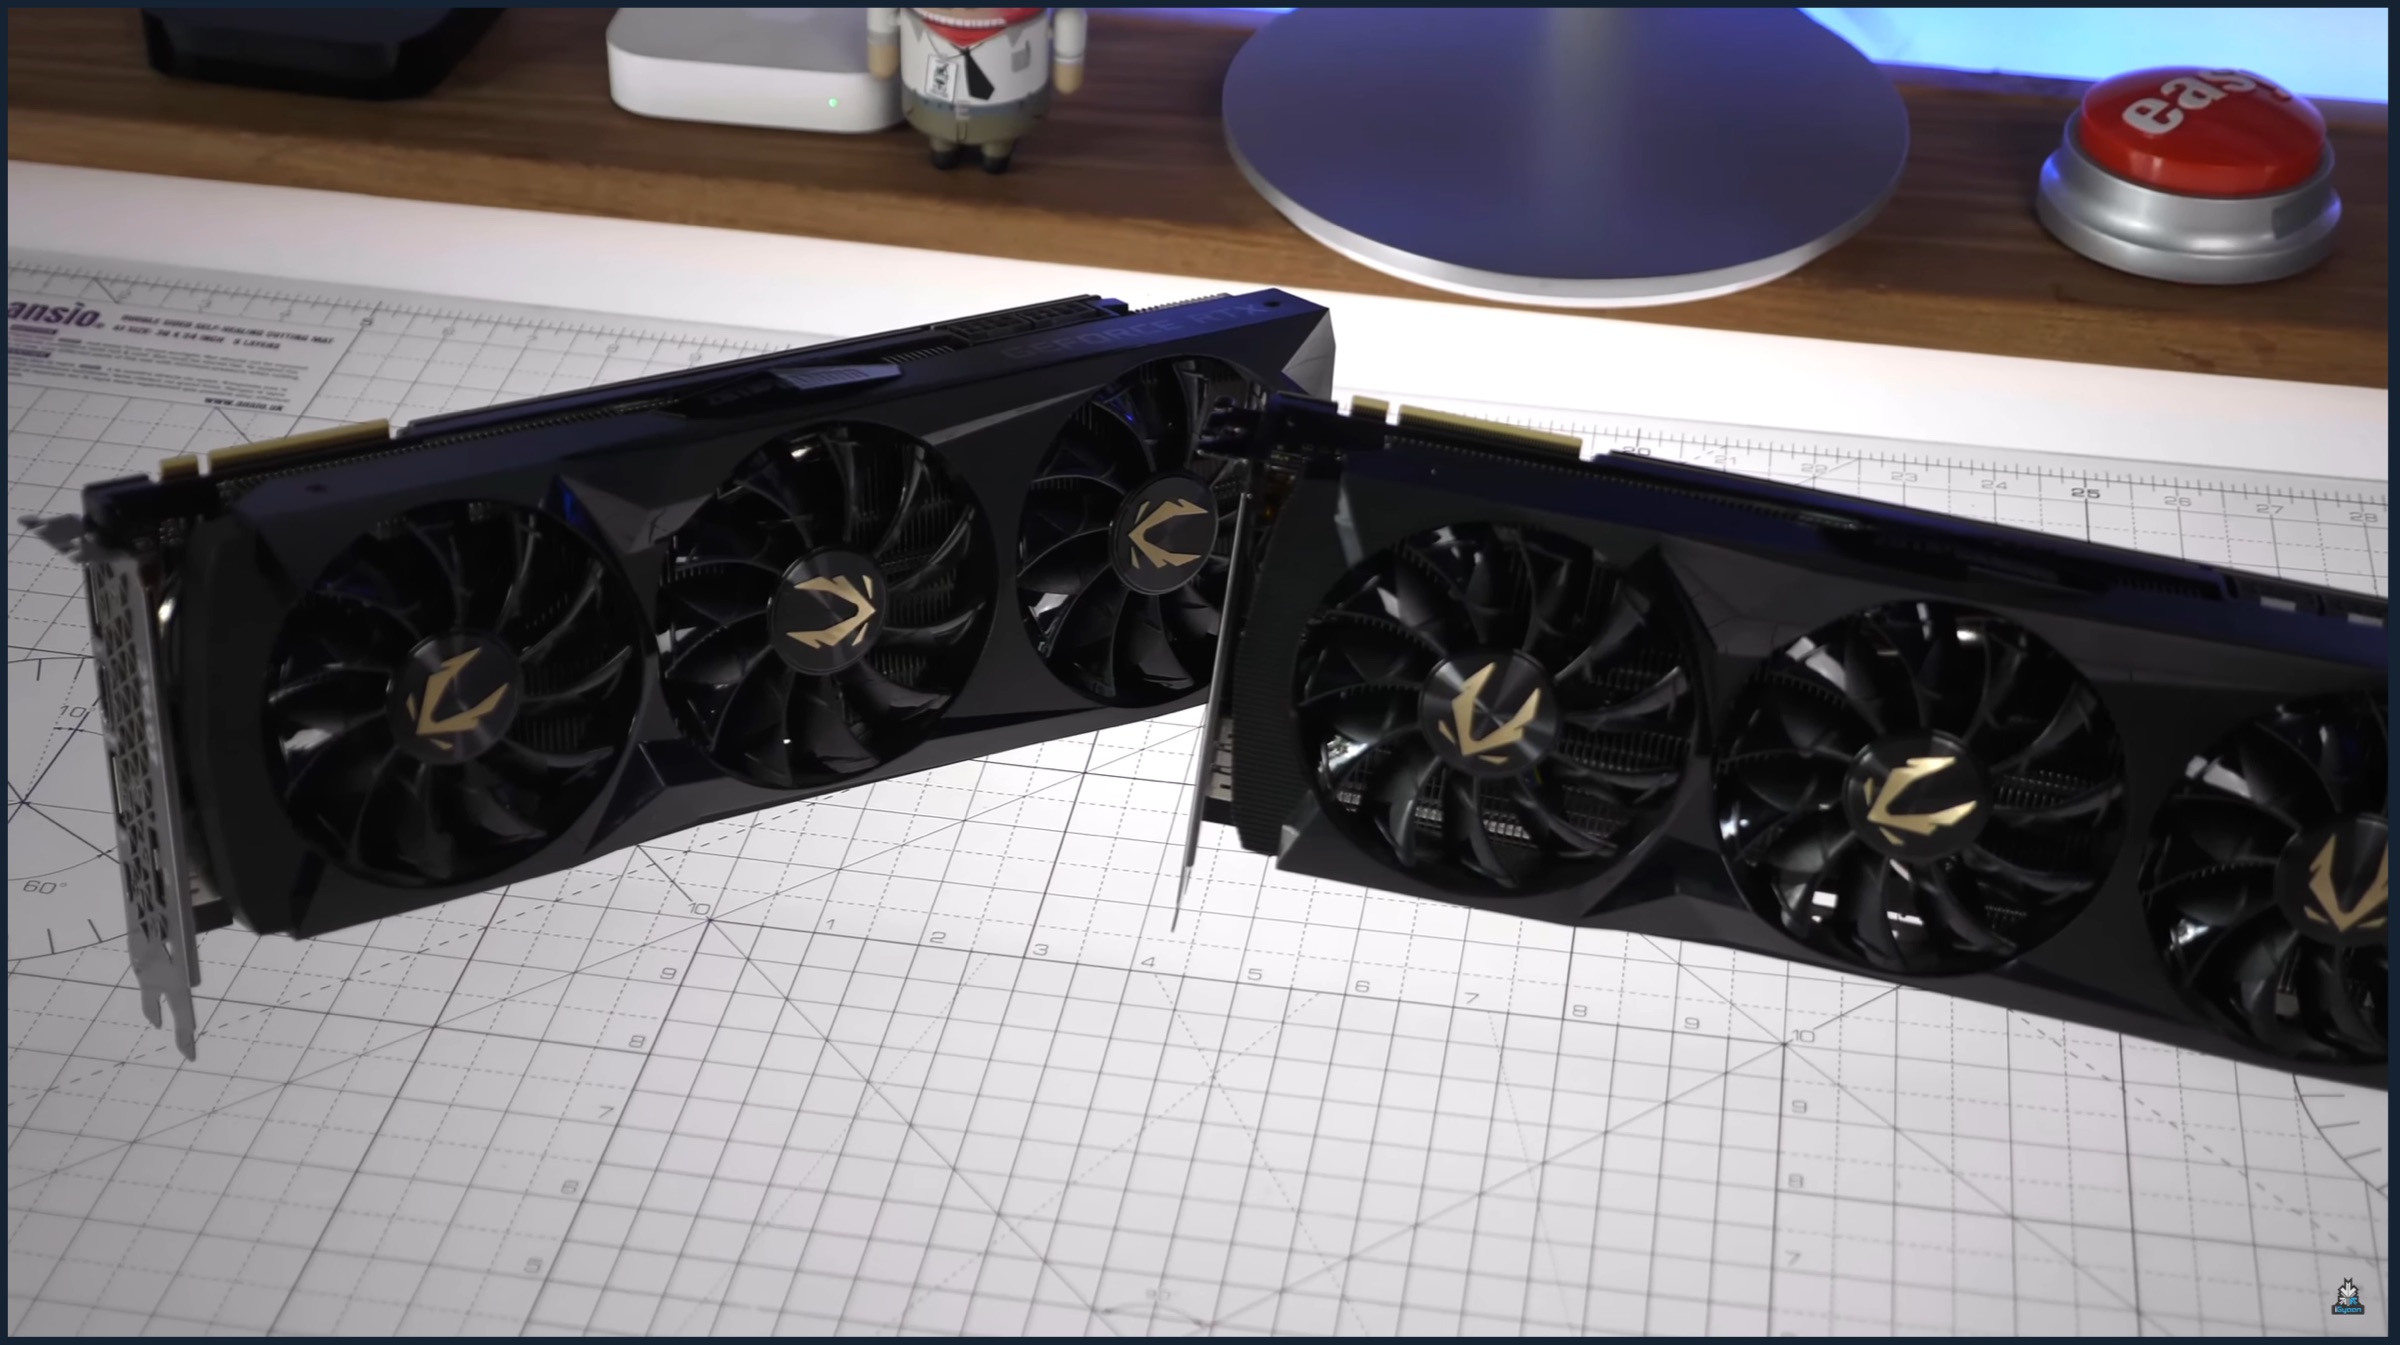
  In order to make our beast build resilient for times to come, we decided to go for two of the absolute flagship GFX cards from NVIDIA, the 2080 Ti. Each video card has 11 GB of GDDR6 memory and 14Gbps memory speed. Since we render 8K Red Camera footage for our videos, a dual 2080 Ti setup will provide the VRAM memory required to render the aforementioned videos in real time. Moreover, playing the most demanding games on the planet would be a breeze with the dual card setup. Both the 2080 Ti cards are linked with the EVGA NV Link bridge.
 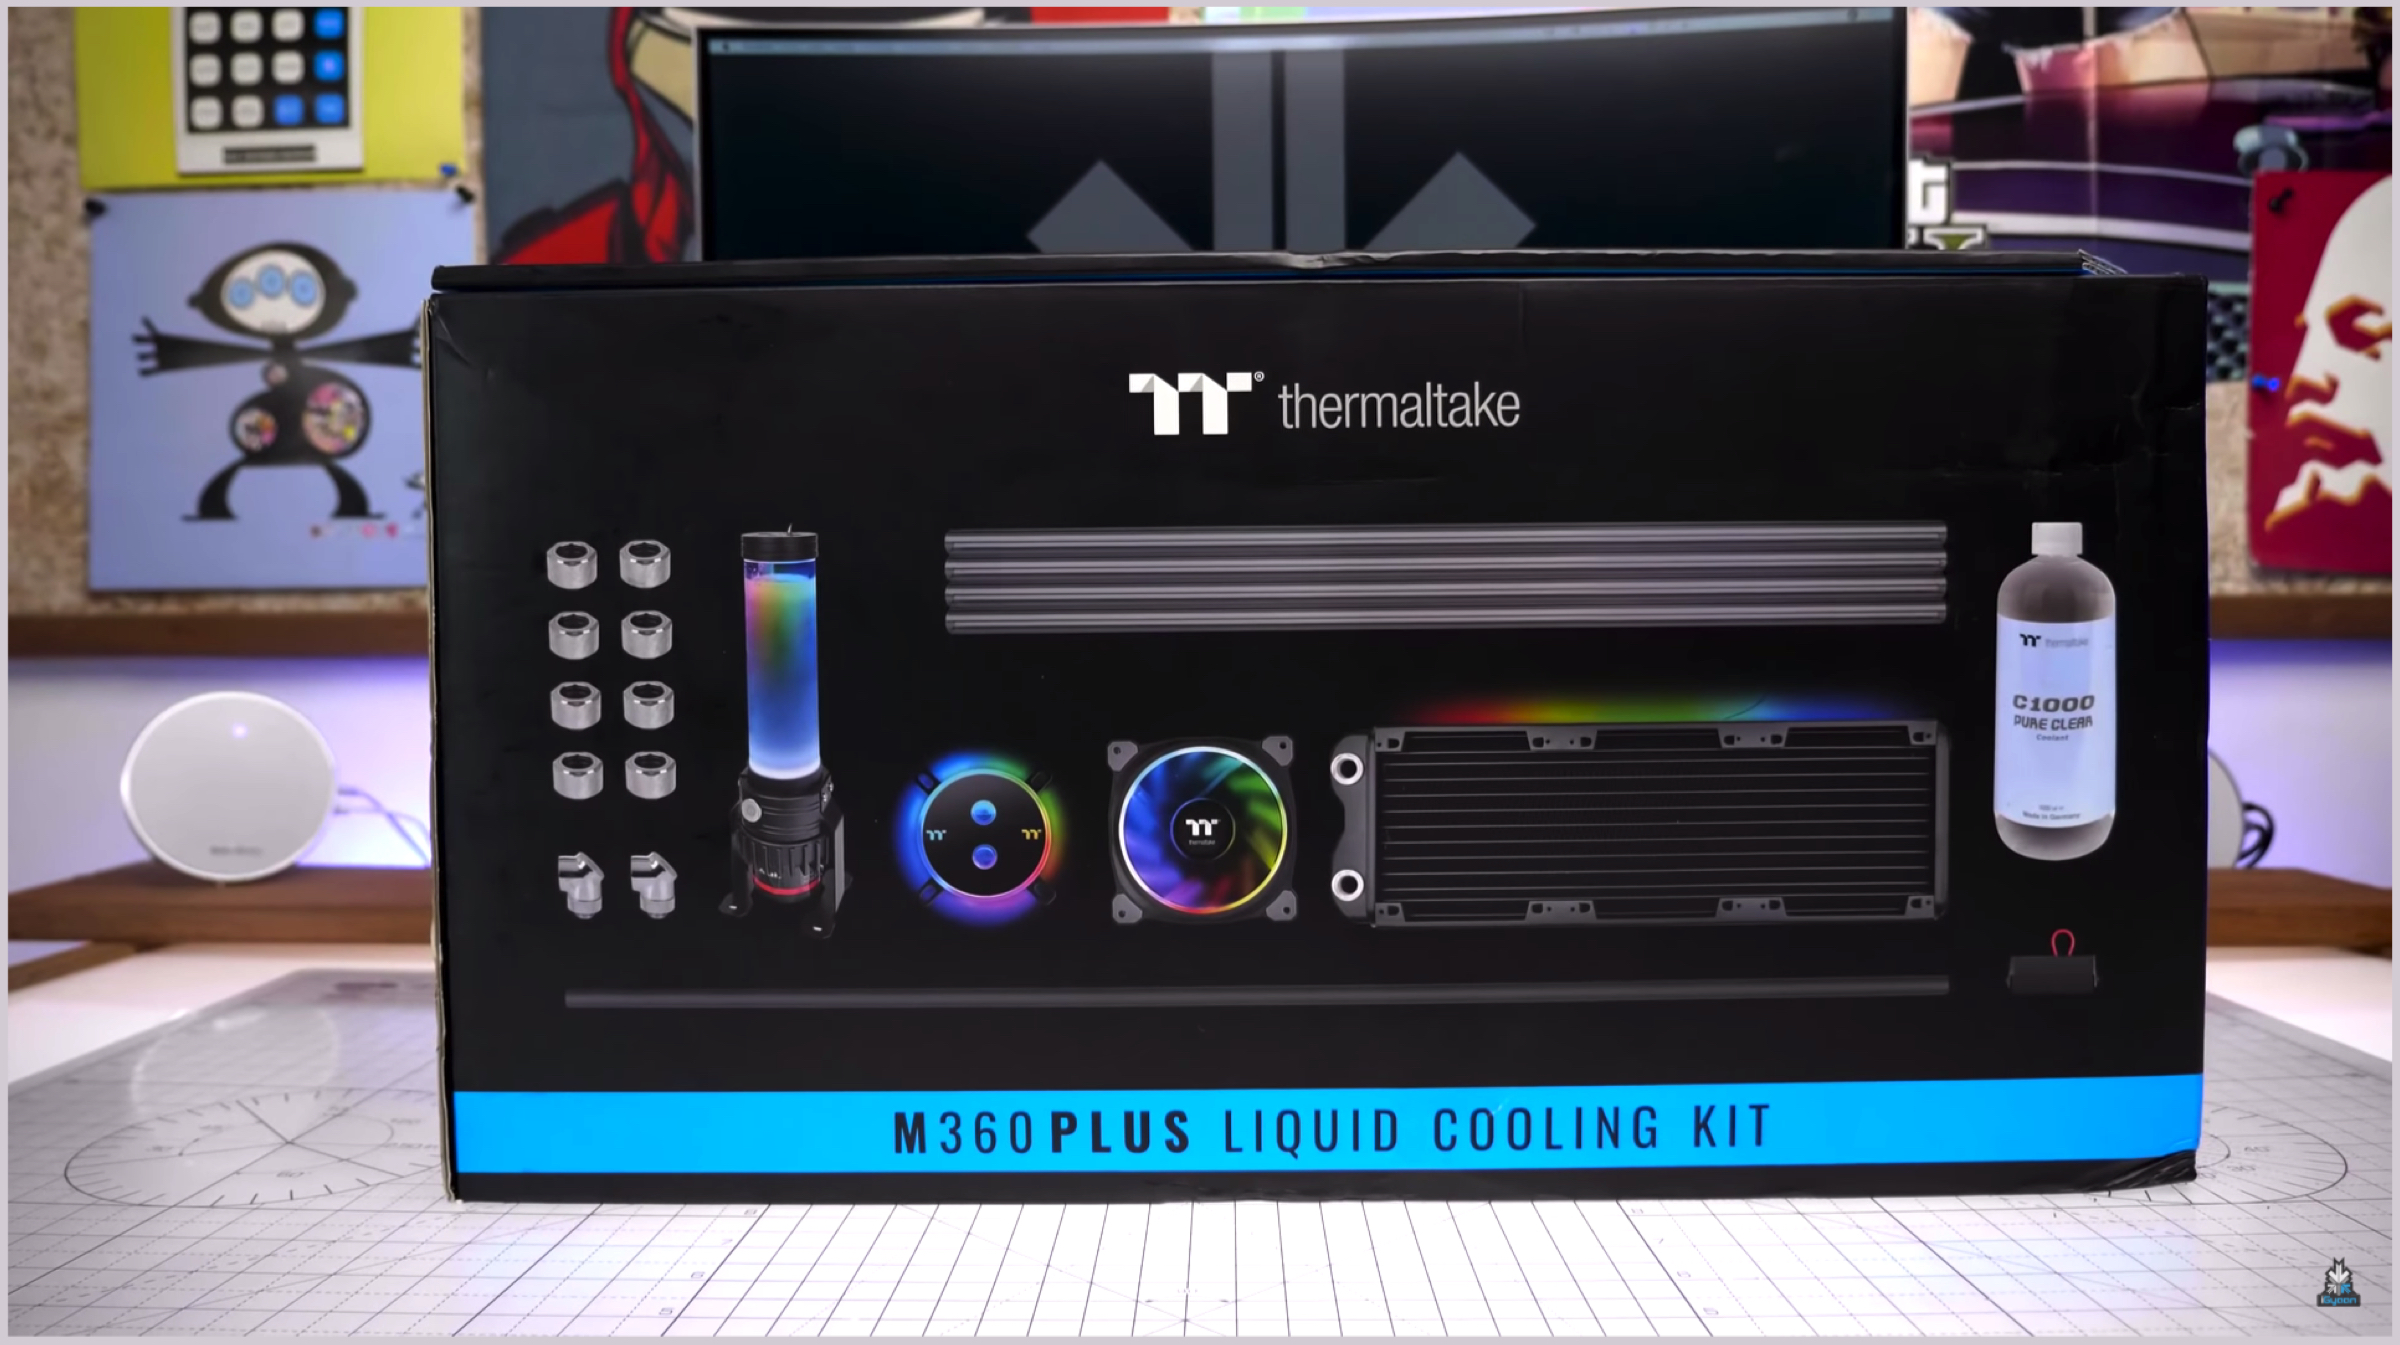 We wouldn’t want our beast build to overheat at any point in time, so we chose to hard-tube the entire system. The kit we used was the Thermaltake Pacific M360 Plus Cooling Kit. It includes a water block, the D5 pump, 3x120mm fans, 360mm radiator, clear coolant and 8 C-Pro compression fittings along with 2 adapter fittings and 4 PETG hard tubes. We are also using the Thermaltake Pacific 12mm bending kit for hard tubing. However, we came upon a decision to not install the hard tubing until all the components are completely installed, so to suffice until then, we chose the Antec C400 Glacial CPU cooler. It has a PWM silent fan and pure copper heat pipes.
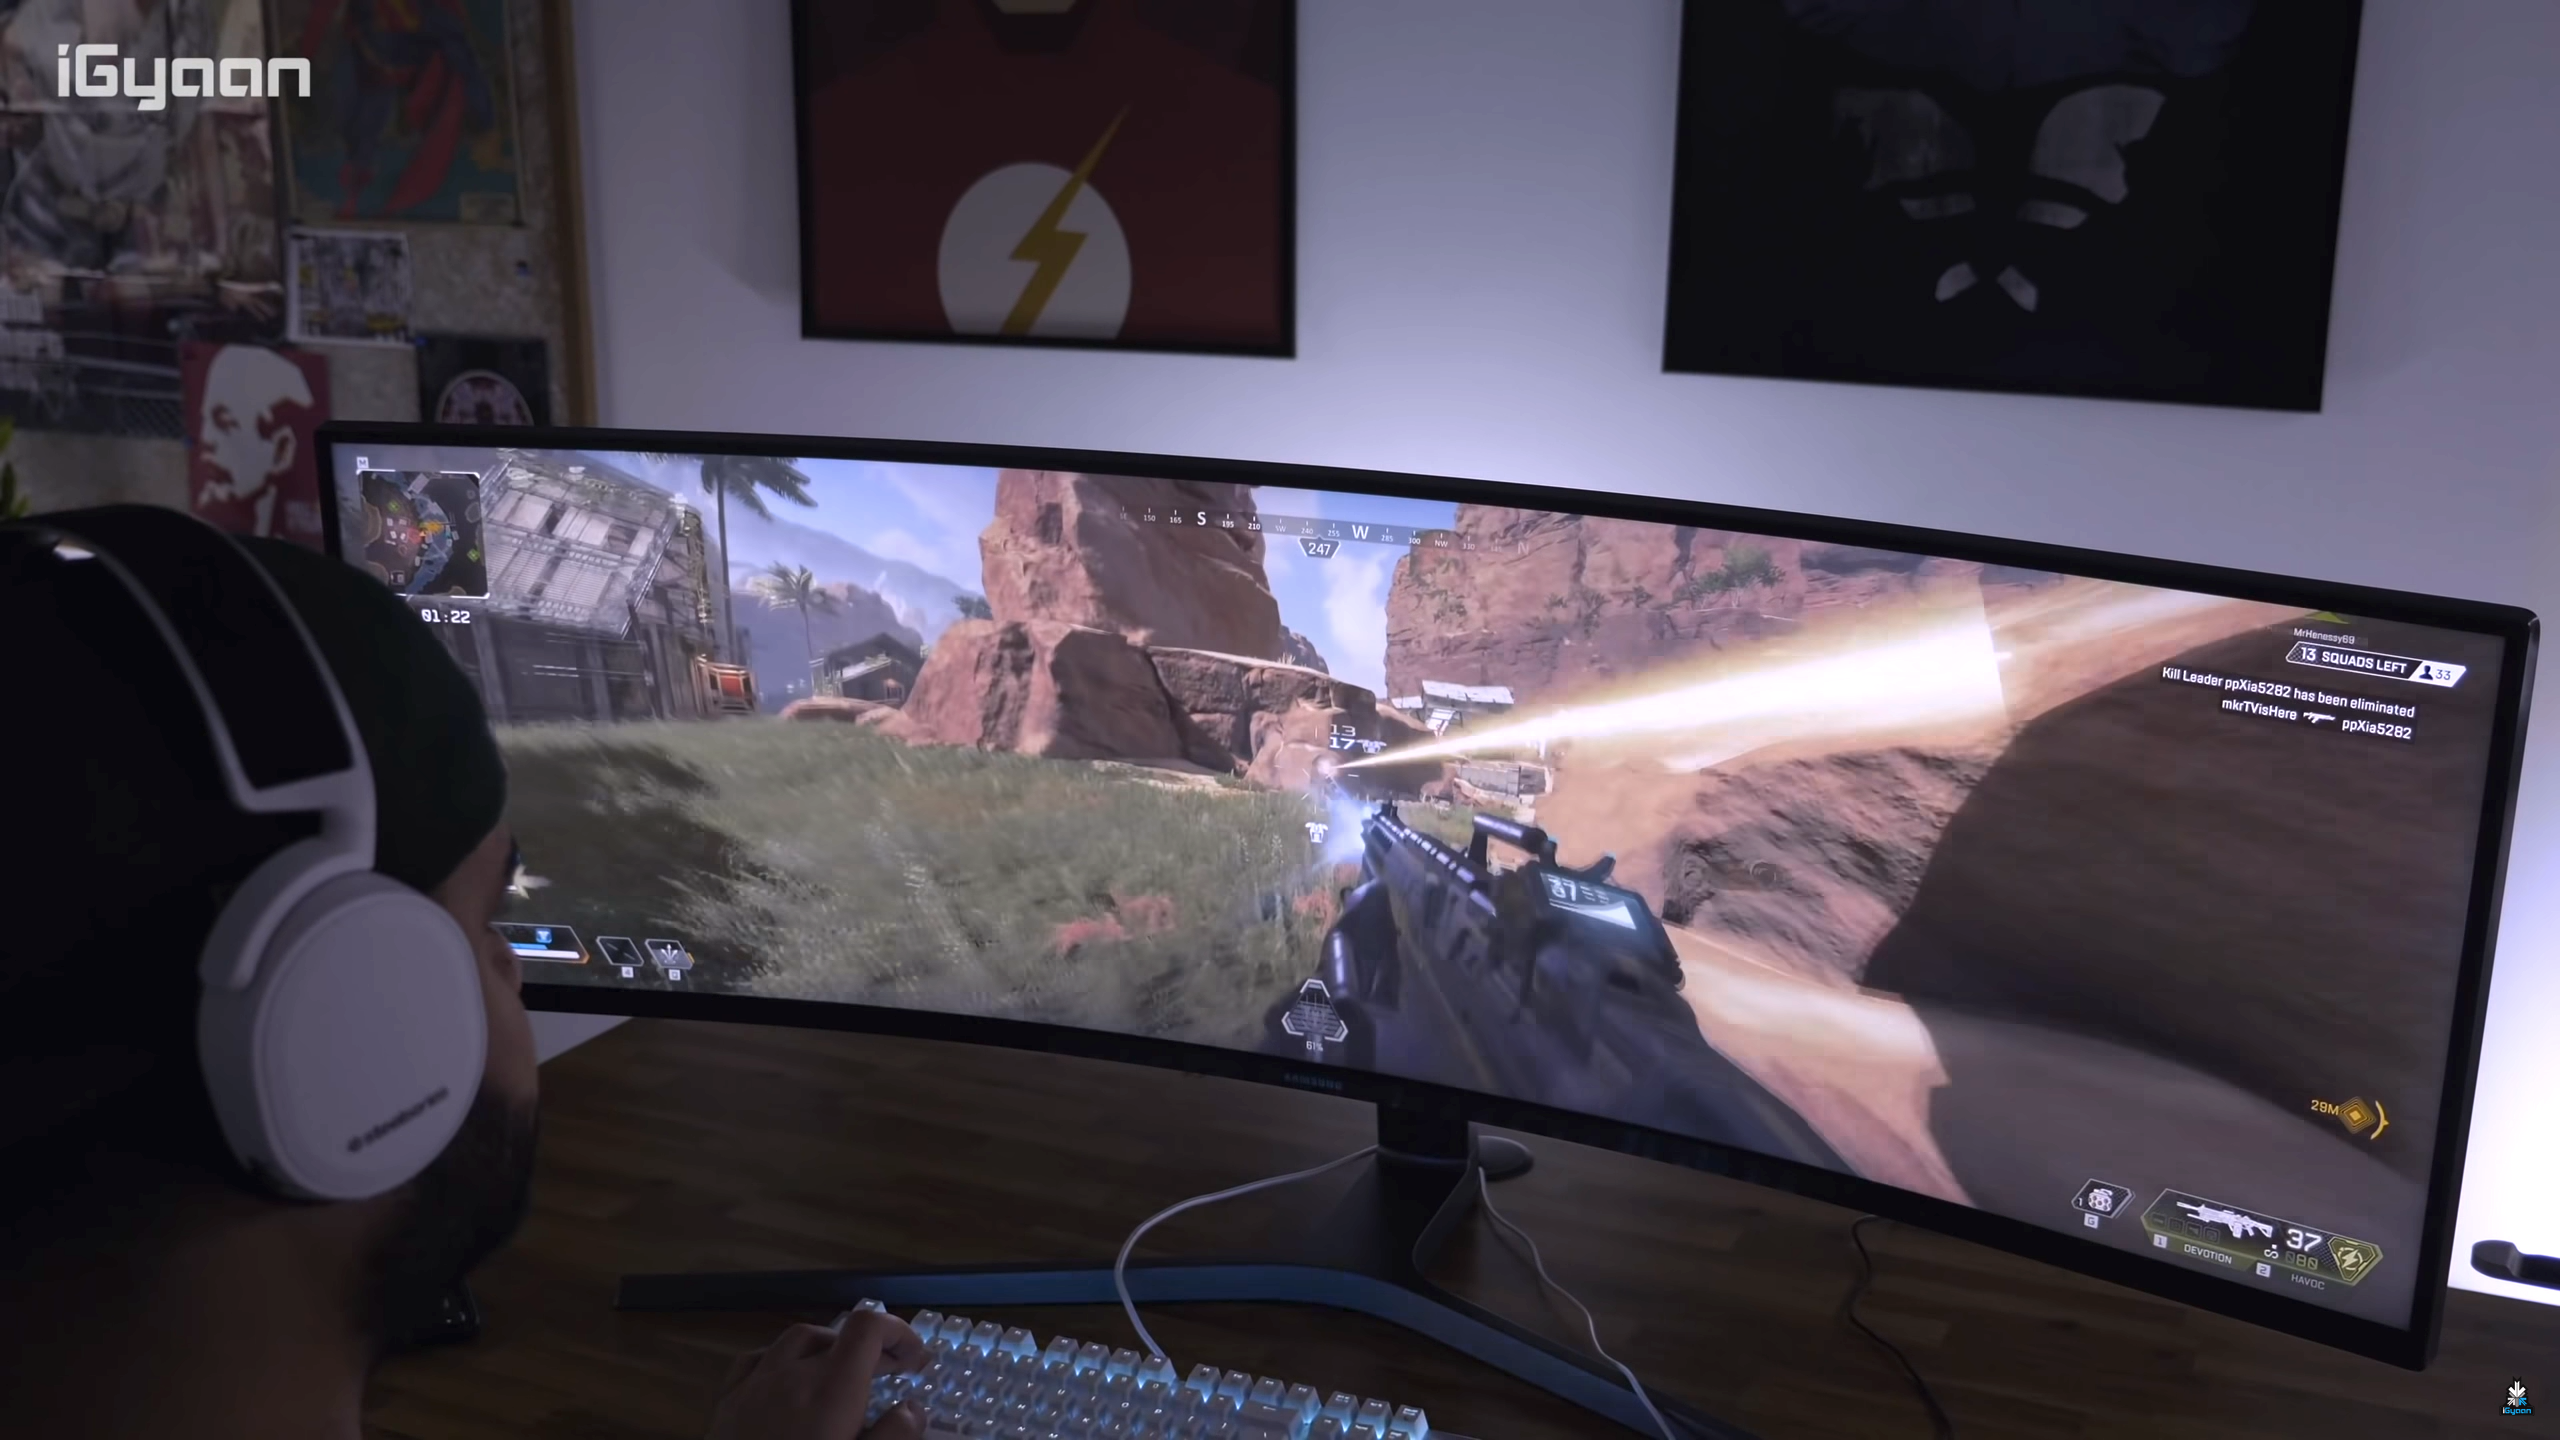
  As mentioned previously, the build will be used to edit and render high-resolution videos as well as to play graphics intensive games. To fulfil both the purposes, we chose the Samsung 48.9 inch Ultra-wide curved monitor which has a response time of 1ms and a refresh rate of 144 Hz. With a resolution of 3840 x 1080 px, the display features AMD’s FreeSync technology.
 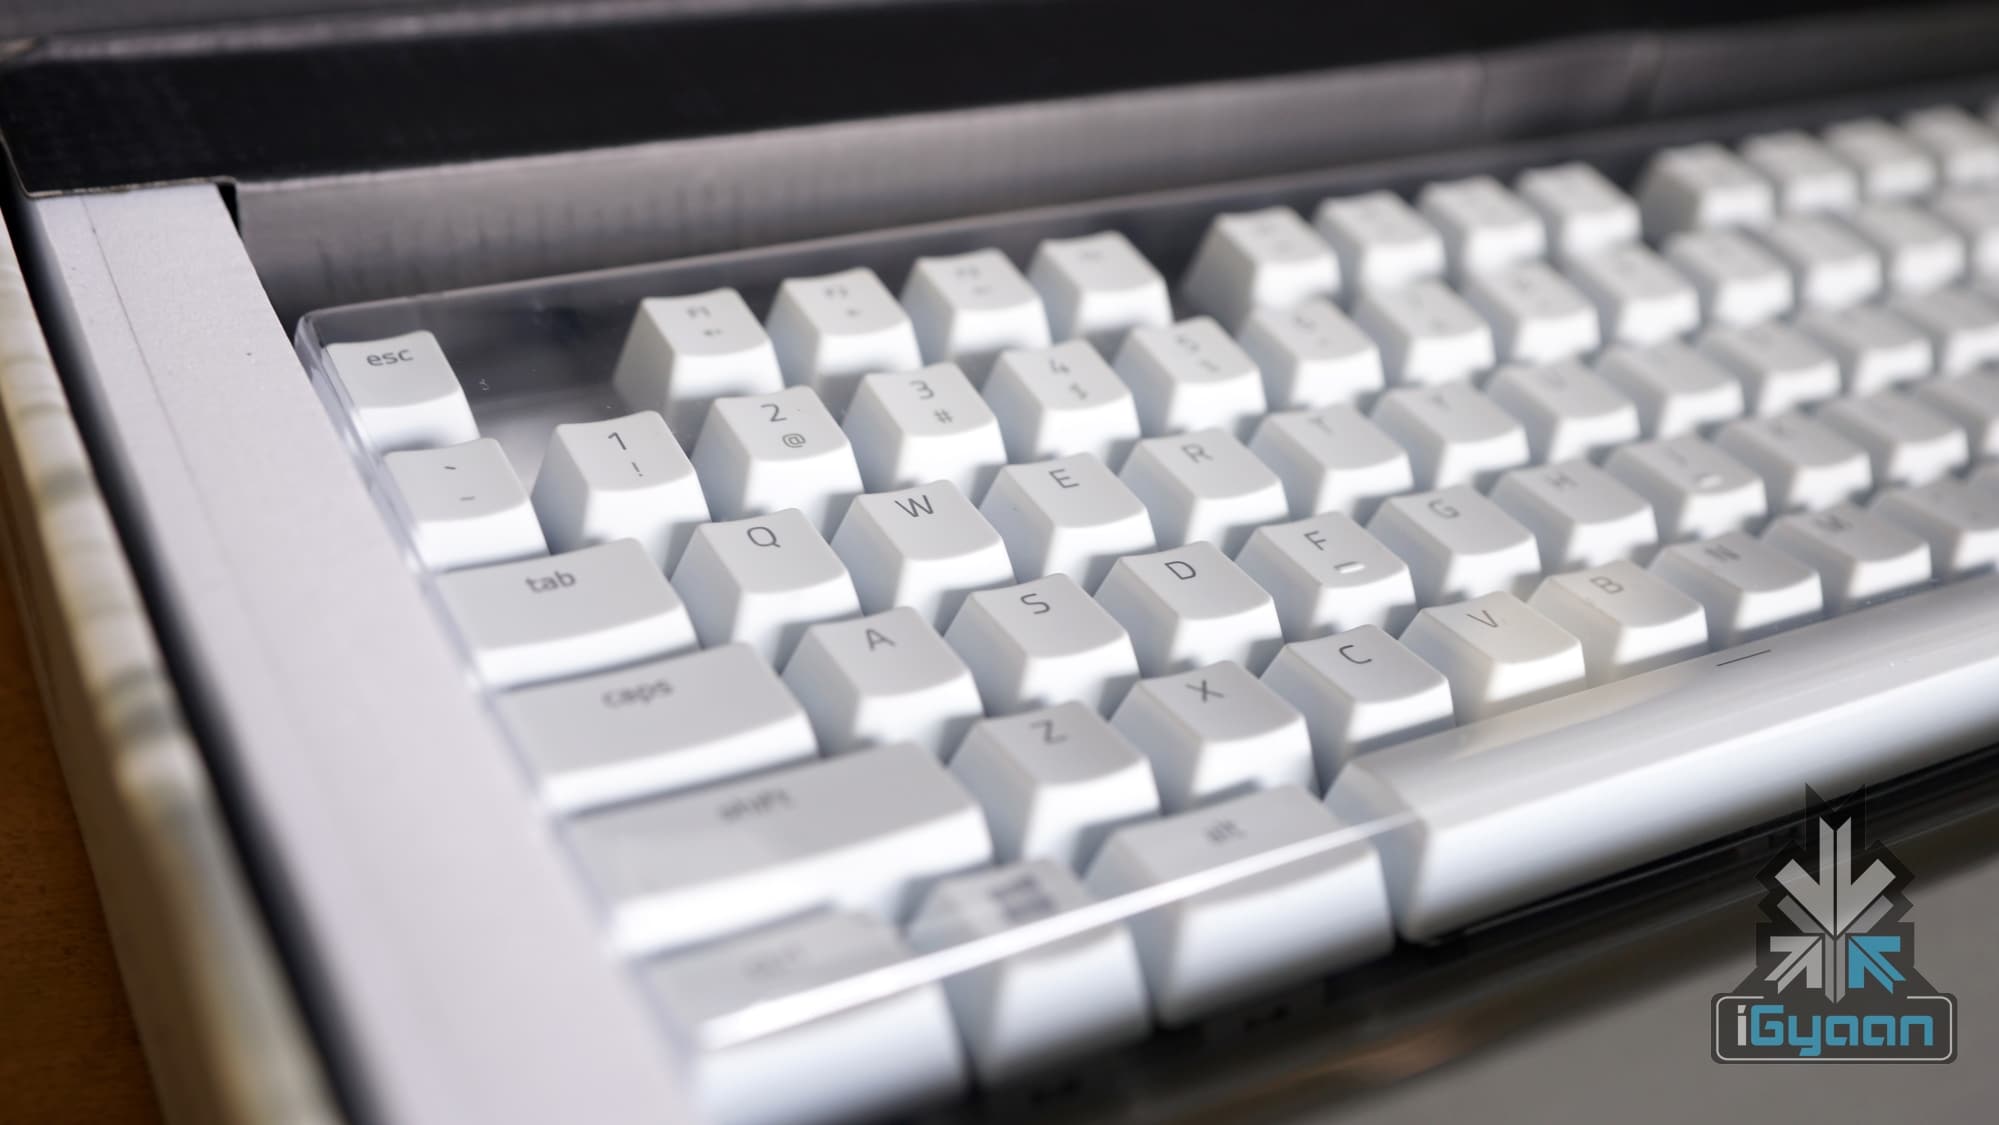 In terms of peripherals, the Razer Black Widow X really stood out as a build-compliant keyboard. Firstly, it is white so it complements the setup really nicely, and secondly, it features Razer’s top-of-the-line tactile Green mechanical switches. The keyboard has programmable keys and N-Key rollover to prevent any ghosting instances. Plus, it boasts of really solid build quality.
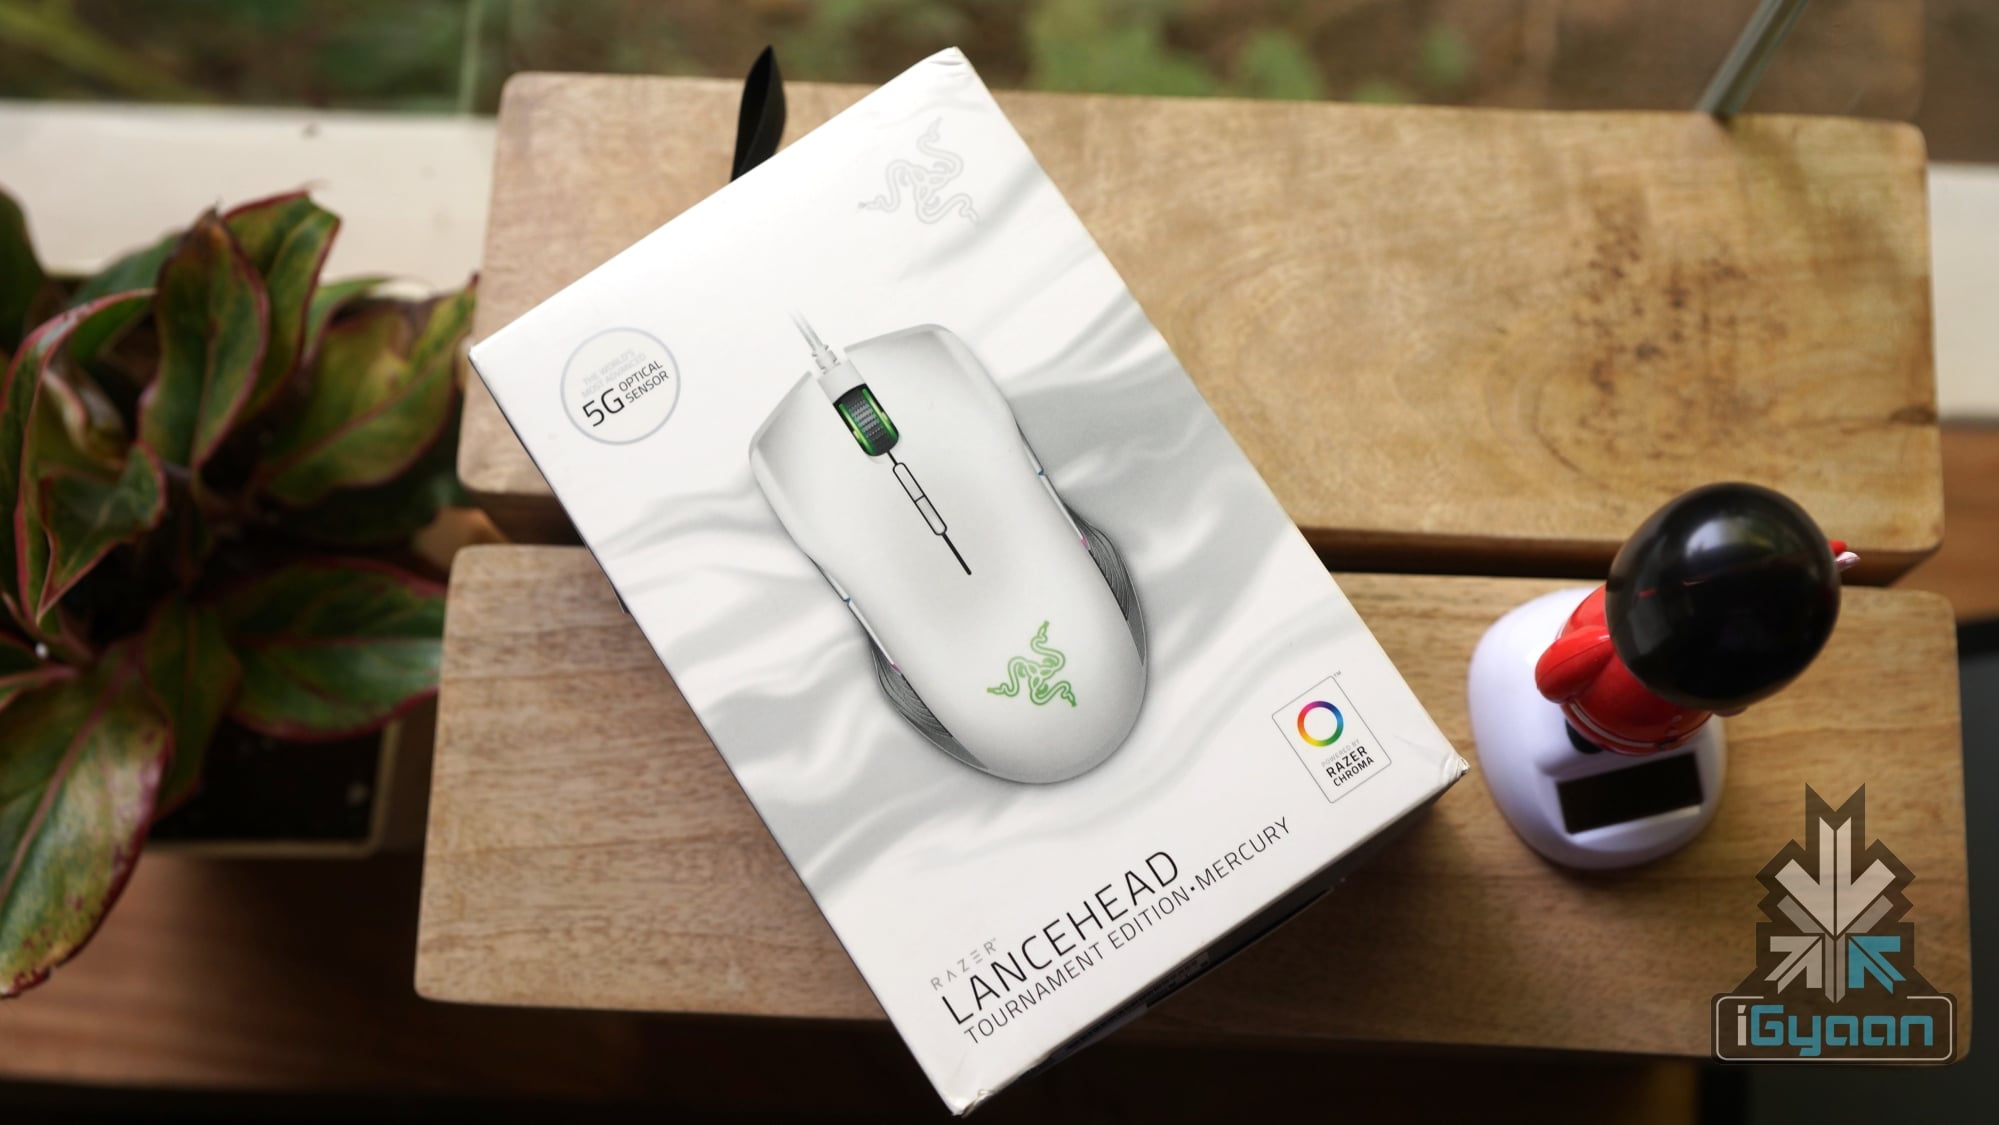 We chose the White Razer Lancehead as it has an ambidextrous design, along with rubber grips on either side. It has a 5G optical 16,000 dpi sensor and is claimed to be optimized for 50 million clicks. Users can customize various sensitivity profiles in the Razer Synapse application. Using Razer Chroma, a multitude of colour schemes can be synchronized between both the mouse and the Keyboard.
 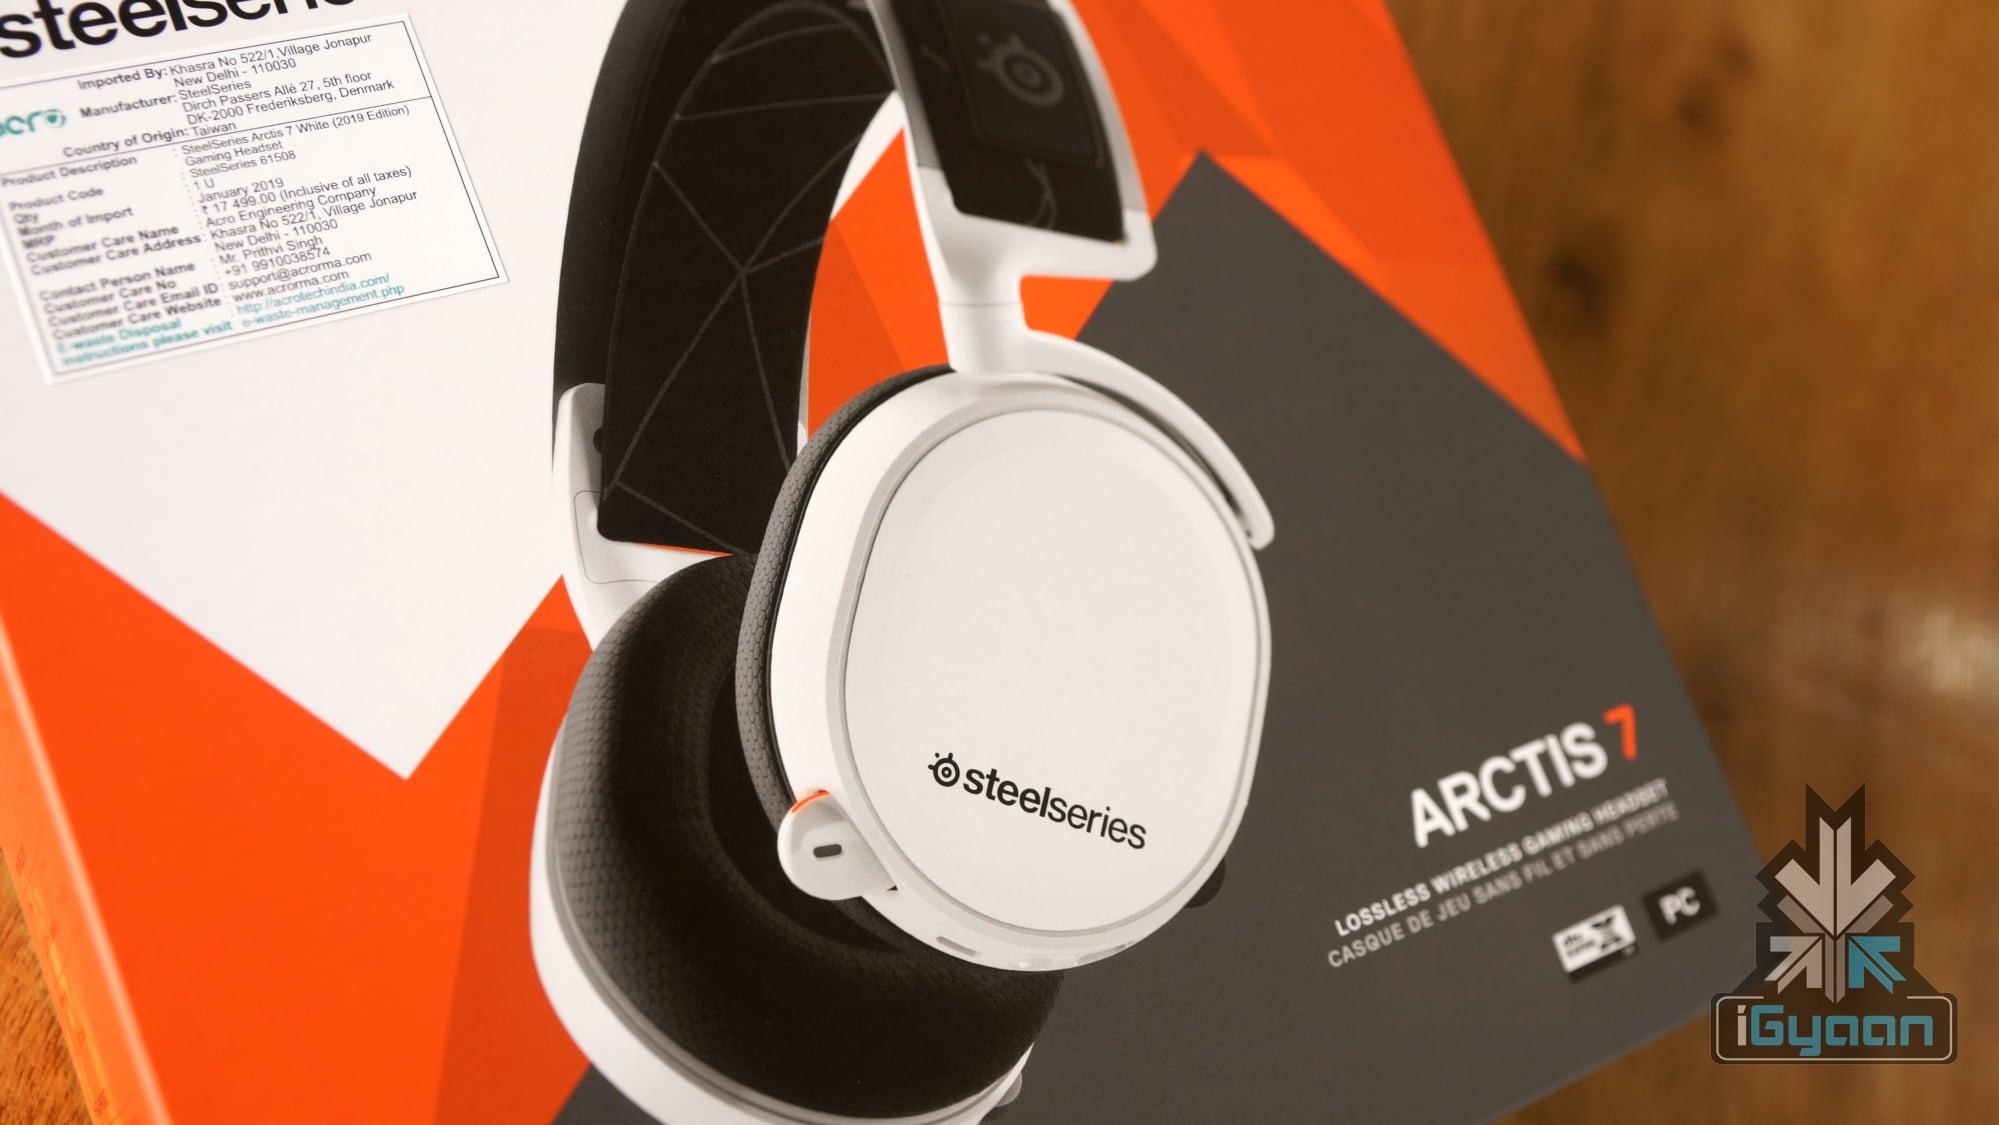 The Steelseries Arctis 7 is one of the most comfortable and good-sounding pair of headphones in the market. The two sweetest perks were the facts that they are wireless as well as white in colour. They connect via a 2.4GHz receiver so that latency loss is eliminated. The headphones are quite comfortable and have a battery life of almost 24 hours (as claimed by Steelseries after the latest firmware update).