Tag: do it yourself

  • A Mobile Phone That You Can Build Yourself

    A Mobile Phone That You Can Build Yourself

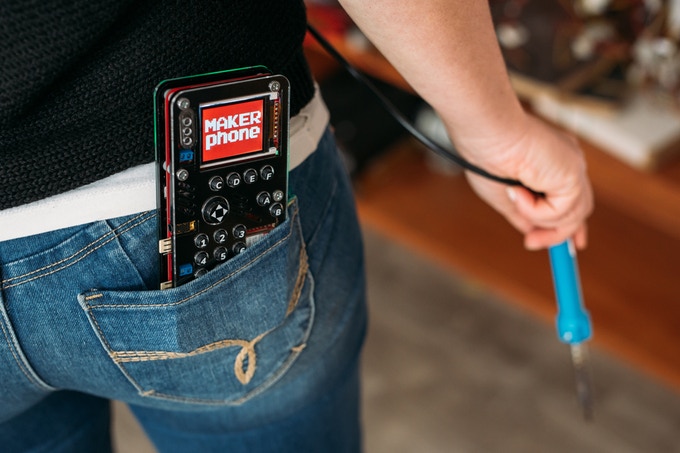
    We have all wished that we could build a phone ourselves. Well, the MakerPhone brings you a step closer to this dream. It is a fully functional mobile phone that you can build and code yourself. The kit contains parts and instructions to make the phone yourself. It is meant to be a fun learning experience for beginners who like to use tools and see how every technology functions. This is an interesting concept and the company is currently looking for support through a crowdfunding website. 

    What You Can Learn

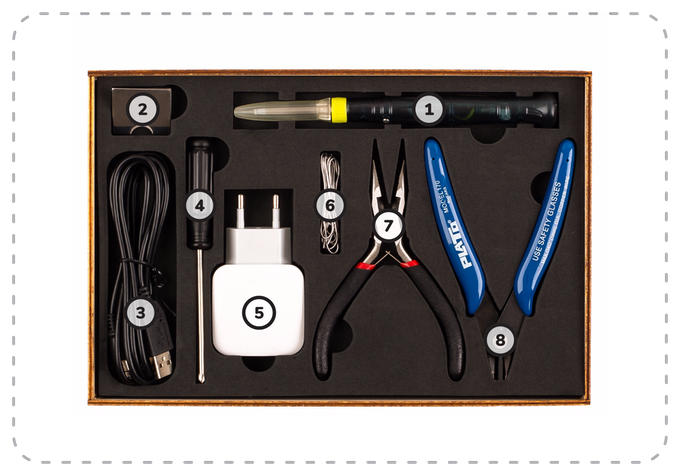
    You can learn what a resistor does and how it functions. Leaning about the basics of electronics is a great experience and can get you interested to make more things. You can learn how to solder which can be a great life lesson – something you can use for a lot of different purposes as well! It teaches how to code in Python and as well as the children’s coding application called Scratch. Arduino (which is based on C/C++) is also a part of the learning experience.

    They previously have built another DIY gaming console called MAKERbuino and the company says that the DIY phone is different in more ways than one. The MAKERphone includes a color screen and a better micro-controller with their custom software. The phone also has Python programming language compatibility and Scratch programming language compatibility. Other significant changes are dedicated DAC and electronic volume controllers for sound regulation and mp3 playback , 8 individually programmable RGB LEDs and better PCB architecture for easier soldering. And it isn’t all just for show! It can now make calls, has a SIM card, and built-in Wi-Fi and Bluetooth.


    One can also play games such as space invaders, pong, or snake on the phone once the assembly is complete. Apps such as a custom media player that only plays cat videos, programs in Arduino, lines of code in Python are some of it’s many attractions. According to the company, the DIY Kit is made for anyone above 11 years of age. The average build time is around 7 Hours.

    What’s In The Kit

    Also Read: Samsung Galaxy S10 To Not Have The Iris Scanner

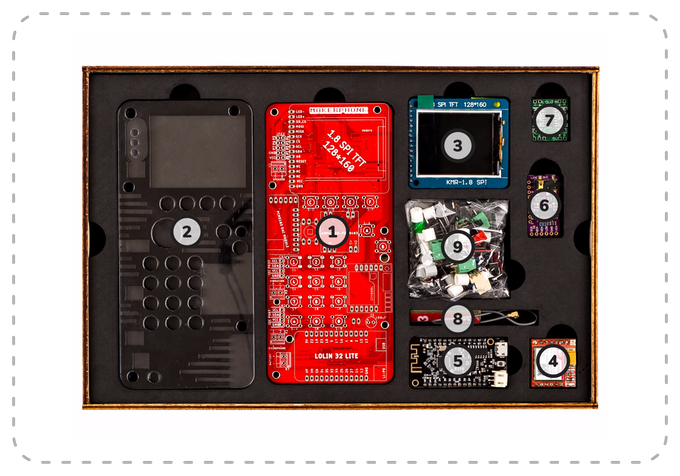
    These are the items that the Kit will contain:

    MAKERphone circuit board – the main board that connects all the components in a uniform device that can work as a mobile phone

    MAKERphone casing – multiple sheets of acrylic cut with the power of lasers. They protect the innards and give MAKERphone this sleek look

    128 x 160 full colour TFT LCD – for playing games, displaying phone numbers and everything in between

    GSM module – a tiny module responsible for everything related to calling and texting other people

    Main microcomputer module – a dual core processor with built-in Wi-Fi, BLE, and a charging circuit

    Sound module – a board with a DAC (digital to analog converter) chip and a headphone jack for music playback (responsible for ringtones, alarms, game sound effects)

    Amplifier module – makes loud buzzes, bleeps and bloops

    Stick-on antenna – for superb phone signal (a.k.a. send text messages while in the bathroom)

    A bag with other tiny electronic components such as pushbuttons and coloured button caps with a 128 MB SD card preloaded with games and apps included


  • 10 Useful Things To Do With Your Old Laptop

    10 Useful Things To Do With Your Old Laptop

    Despite everyone’s assumptions, the geek inside you is not always privy to the latest and greatest technology. If you’re stuck with an old, slow, crappy computer, there are a few things you can do to make the best of a bad situation. Whether it’s a desktop computer or a laptop, whether or not it’s broken, and no matter how old it is, it can still be useful to you.

    1. Sell The Working Parts

    internal laptop

    You can dismantle your entire broken computer or laptop and sell the working parts online. Hard drive, RAM, A/C adapters, motherboards, graphics and audio cards, and even an intact case will get you some cash. It might not make your old laptop useful, but you may be able to save up some extra money to buy those cool headphones you’ve been eyeing for months.

    2. Install a Light Weight Operating System

    archbang

    If nothing seems to workout, one of the best things you can do is install a new operating system altogether. It’ll definitely shake up your workflow, but with enough commitment, you can use one of the many Linux-based OS to give your computer a major speed boost. If you are already familiar with Linux, we will recommend ArchBang, otherwise Ubuntu or Chrome OS might work well for you.

    3. Turn it into a Wi-Fi Hotspot

    LibrarySymbolLaptop-WifiBl

    Well, this one of the best things you can do with your old laptop. Turn your laptop into a hotspot for sharing an Internet connection via Wi-Fi. There is a step-by-step guide on Windows XP or 7 and there is also the option of using 3rd party software. Specifically, Connectify. If you’ve already got a router with Wi-Fi, run Ethernet on the laptop and with Connectify you can create a secondary network using the same Internet connection.

    4. Use it as a Digital Photoframe

    laptop-screen

    If your laptop’s screen is fine, you can use it to build a cheap digital photo frame. With a working wireless connection you could even make it show your latest photos. There are loads of DIY instructions available online. So, go ahead and experiment.

    5. Create an External Hard Drive

    hard disk

    If parts of your laptop or desktop computer hardware are broken, you can salvage the working parts. So if the hard drive is still working, you can dismount it and transform it into an external and portable hard drive for your new computer. You’ll have to invest in a USB caddy, which can be bought online easily.

    6. Use it as a back-up machine

    Dusty keyboard

    Lets face it, in this digital world we are struggling with information overload. The floods of gigabytes have taken over our lives, be it professional or personal. This is where your old laptop can be useful for you. Use it as a back-up machine where you can save your photos, documents and video.

    7. Home server for file sharing

    freenas

    Heard about network attached storage? It is like a server for your home or small business network, used for storing files that you share with all the PCs on a particular network. If you’ve got an old PC with lots of storage drive space, you don’t need to buy a NAS, you can make one. FreeNAS is a software program for doing just that, and it’s then accessible by any OS on your network. FreeNAS will also stream media to mobile Operating Systems like iOS and Android and you can even control the user access.

    8. Turn it into a guitar amp

    laptop-ready

    You can turn your laptop into a guitar-ripping audio workstation. Using an older laptop that might not have the fastest processor will work for basic MIDI programming by connecting an audio interface and controlling a virtual amp.

    9. Home Surveillance

    ispymg

    If that laptop has an integrated webcam (most of them do), you can put it for a good use. Reinstall Windows XP or higher and grab a copy of iSpy. Use it to monitor the house, employees, babysitters, kids, pets, and more. You can covertly or overtly watch the goings-on via a Web page or apps on iOS and Android.

    10. Turn it into a Media station

    XBMC-Media-Center_1

    Load all your music and videos onto this computer, if necessary, supply it with an external hard drive. You can now set up your favorite media player, listen to Last.fm, install a TV tuner card, record movies, record music from radio stations, download MP3s, stream music throughout the house using wireless speakers etc.

  • Here’s How You Can Get Android Lollipop 5.0 Right Now on Your Nexus 5

    Here’s How You Can Get Android Lollipop 5.0 Right Now on Your Nexus 5

    Google has started rolling out Android Lollipop 5.0 update for Nexus 5. You can expect the new update soon on your device via OTA in the coming days. However, there are some of us who don’t want to wait anymore. It is true that the OTA method is the most convenient way to upgrade your phone. However, we don’t mind doing some hard work to get the new upgrade.

    So, here is how you can get Android Lollipop 5.0 right now on your Nexus 5.

     Things you’ll need:

    • A Windows computer installed with ADB and Fastboot.
    • Android Lollipop ROM for the Indian version of the Nexus 5. Download it Here.
    • USB drivers for Nexus 5. Download it Here.

     How to do it:

    1. Go to the phone Settings and make sure the Developer mode is enabled.

    2. Put the downloaded Lollipop Zip file into a new folder in the desktop and rename it according to your preference.

    3. Make sure the USB debugging option is on; you can find it under Developers option in your phone’s ‘Setting’ window.

    Nexus 5 Lollipop3

    4. Switch off your phone. Now press Volume Down + Power button simultaneously. This will switch on the phone in Fastboot. You will see Start written in big letters on the top of the screen. Use volume buttons to navigate to Recovery Mode. Once found, select it using the Power button.

    Nexus 5 Lollipop2

    5. You’ll see small Android robot lying flat with a red mark over its belly. Now press the Power button for a couple of seconds and press the Volume Up button once while holding the power button. This will turn on the ADB mode in your device. If it doesn’t, try it again starting from step 4.

    6. Once the phone is in Recovery Mode, use volume buttons to highlight ‘apply update from ADB’ and press Power button to select it.

    Nexus 5 Lollipop5

    7. Connect your phone with the PC via USB. Make sure the PC recognises the device as Android phone with Android Composite ADB Interface functionality in your computer’s Device Manager. If not, uninstall the drivers and install them again.

    Nexus-5-Driver-Installation-Completed

    8. Now press ‘Windows+R’ on you keyboard to launch RUN and type ‘cmd’ to open the Command window.

    9. Type ‘adb sideload <name of the Lollipop zip file>’. For example, if your file name is Lollipop.zip, then write: adb sideload lollipop.zip and press Enter.

    cdm

    10. Now,  you will see that the ROM will be copied onto your phone. This way, Lollipop will be installed. The whole process will take around 10 minutes.

    lollipop

    TIP: If you get confused or lose the track somewhere in between, press the Volume Up, Volume Down and Power buttons together to reboot the phone. And remember, never ever pull it off charging.

  • Smart Cap : A DIY Google Glass Replica Made For Only Rs.4500

    Smart Cap : A DIY Google Glass Replica Made For Only Rs.4500

    We love to get ‘inspired.’ Our Bollywood movies are predominantly ‘inspired’ by previous works by other filmmakers who in-turn get their inspiration from others. But sometimes these inspirations lead to some cool new inventions like a Google Glass replica that costs a meager Rs. 4500 in comparison to the hefty price tag of Google’s Augmented glasses.

    Smart Cap 4
    Though the Smart Cap looks rudimentary, it is quite functional

    Now Cochin-based Arvind Sanjeev has invented the “Smart Cap” which is basically a nerdier version of the sleek Google Glass. Now we, of course, need to cut him some slack as he didn’t have huge monetary resources backing those researchers at Google X.

    Arvind’s design though rudimentary is pretty functional. The raw materials that went into making the smart cap are easily available. The Smart cap uses a USB Webcam, an LCD panel, aspheric lens, headphones, a Raspberry Pi Board, a sun board sheet and glue which is a DIY guy’s favorite tool.

    Now since creating an operating system would have been a long task, Arvind went with open Android as the OS for Smart cap. The front of the cap has the camera, the Raspberry Pi board, and 2.5 inch LCD display mounted on it. To make the LCD display legible at such close distance, he used an aspheric lens.

    The Smart cap works by taking commands using the microphone on the headset. The device can help you with navigation, Google search, YouTube, webcam recording and first person viewing of other cameras, etc.

    Smart Cap 1
    Smart Cap can be used to access maps, send emails, take photos and more.

    What is really appreciable is that he put the entire project in DIY and posted it for anyone to create their own smart cap. He has been doing this for a while and has uploaded several DIY tutorials. He also owns a start-up called A.R.S devices which make devices for automation, connected devices and safety purposes. He has in line for a hardware patent which will let you control your car using a smartphone app. Now that’s an app we’d all love to have.

    Even though the Smart Cap is inspired by Google Glass, Arvind’s audacity and patience in creating this device is commendable. The value of DIY has always been to bring replicated expensive technology and attaining similar levels of functionality using cheaper alternatives. The Smart cap stands up to the value, and though it looks rudimentary, it is pretty dope, almost like a prop from a sci-fi movie about robots. So if you have the talent of DIY, then go ahead, get in the game and teach the world how to make some awesome stuff inexpensively.

  • DIY : How to Root Micromax Canvas 4 A210

    DIY : How to Root Micromax Canvas 4 A210

    If you recently bought the new Micromax Canvas 4 A210 and need root access to download games or modify the OS?

    Here is a quick method by iGyaan to Root Micromax Canvas 4 A210!

    Simply follow the instructions below.

    (Note : the following method will also work for the Micromax Canvas HD A116)


    Here is what you need

      1. Micromax Canvas 4 A210 (For Sure)
      2. Windows PC/Laptop
      3. USB – MicroUSB Cable
      4. iGyaan Micromax Canvas Root File (based on Motochopper) (Right click and save)
      5. Patience and Perseverance 


    Root Micromax Canvas 4 A210


    Step 1:

    Make sure you phone is fully charged.


     Micromax Canvas 4 A210 Root 0

    Step 2:

    Enable USB debugging on your device.

    Go to Settings > Development > USB debugging.

    Disable Verify Apps over USB like shown above.

    Not: If you don’t see the  Development Panel, enable it by tapping several times on the Build Number in the Setting > About screen .

    Once enabled connect your Canvas 4 to your PC via the USB cable. (make sure all the drivers for the phone are installed, this will happen automatically)


    Step 3:

    Download the iGyaan Root Tools zip file above and unzip them into a folder called “root” on the Desktop.


    Step 4:

    Open this new “root” folder and launch Run.bat and press Enter.

    Micromax Canvas 4 A210 Root 3

    The Process will begin and your device may reboot several times, DO NOT REMOVE THE CABLE until the process is compete.

    Micromax Canvas 4 A210 Root 2

    Once completed you will find “SuperSu” in the application list. You now know how to root the Micromax Canvas 4 A210.


    Micromax Canvas 4 A210 Root 1

    UN Root Micromax Canvas 4

    Simply Open SuperSU > Settings > Full Unroot

    Your Micromax Canvas 4 A210 will reboot and Unroot.


    Video

    [youtube id=”R8VFEcmzCdw” width=”100%” height=”300px”] 


    Related Products

  • How To : Upgrade Micromax A85 to Android 2.3.4 Gingerbread, Step by Step ( iGyaan Version)

    How To : Upgrade Micromax A85 to Android 2.3.4 Gingerbread, Step by Step ( iGyaan Version)

    Happy March 2012 people, since we promised a stable workable rom for the A85/ cherry Magnum / K Touch k700 with Android 2.3 , we are here to deliver in time. 

    Before we begin with the update process there are a few things we would like to clear out few important things with you people.

    Important Notes 

    1. We do not take guarantee that this rom will work perfectly and could crash / damage / brick your device. So proceed with your own caution.


    2. This ROM has been cooked by iGyaan but is majorly based on the official Cherry Magnum 2x update (you will see once you flash your phone)
    3. We have added bug fixes and tweaks from the Micromax Android 2.2 rom and K-touch K700 Rom to this upgrade.


    4. Unfortunately during the update you will loose all data/ apps and most importantly gesture features from the Micromax 2.2 stock rom. So Please Backup Accordingly.


    Here are our finding with this rom.

    (Based on 3 test units)

    1. Its very stable = Little or no crashes.
    2. Audio quality is excellent and networks are solid.
    3. Battery performance seemed better / depends on usage.
    4. Very fast and snappy.


    Okay now that you are aware of the above lets begin with the process.

    Tutorial

    What you need

    • Micromax A85/ Cherry Magnum 2x / KTouch K700 (either will do).
    • Windows PC.
    • RAR expander ( winRAR etc.).
    • USB-MicroUSb Data Cable.
    • iGyaan Update Bundle : [button link=”https://rapidshare.com/files/1042248031/igyaan_a85_bundle.rar”]Download Here[/button]
    • Finally , A strong heart and lots of patience.


    Step One 

    • Make sure you downloaded the iGyaan Update Bundle : if not then [button link=”https://rapidshare.com/files/1042248031/igyaan_a85_bundle.rar”]Download Here[/button]
    • Extract the RAR on your desktop.


    Step Two 

    • Extract vcredist_x86.rar and install the software within ( its Visual C++ redistributable)


    Step Three

    • Power off your A85/ Cherry Magnum 2x / KTouch K700
    • Once OFF : Hold the Power + Volume Up button till you see a Green Display 
    • Let go immediately after you see the green screen on the device

    Step Four

    • Plug in the USB cable into the PC and attach it to the A85/ Cherry Magnum 2x / KTouch K700
    • Windows will try and install the drivers but will not be able to.
    • Manually select the drivers ( included in the igyaan bundle in a folder called usbpcdriver)
    • Once the drivers are successfully installed Reboot you pc

    Step Five

    • Once rebooted Navigate to the iGyaan bundle and then folder NvMultiDown
    • Now run the NvMultiDOwn.exe


    Step Six

    • Once the program is running On the right side select the “iGyaan 2.3.4” update folder 
    • Uncheck the 2 boxes below the file location. (if they are checked.)
    • Remove the battery and usb cable from you A85/ Cherry Magnum 2x / KTouch K700
    • Repeat Step 3 from above and connect the Device to the USB cable
    • Once you connect the device will show up in the NvMultiDown program
    • Your device will start to update.

    Step Seven

    • Once Update finishes your device will boot with Android 2.3.4
    • Enjoy!


    Now a lot of you may face problems with the update, so those who figure out answers to the problems please help each other out in iGyaanForum.com in the discussion thread : [button link=”http://igyaanforum.com/showthread.php?t=541″ bg_color=”#bcc483″ border=”#7a097a” text=”dark”]Discussion Thread[/button]


    Please don’t mirror the downloads and keep the original link intact.

    If you create instructions don’t forget to link back to this page and don’t copy our links.


    Micromax Android 2.2 Stock Rom

    Incase you are facing problems with the 2.3 build that you cannot find a fix for, we have instructions to revert to the original rom. in our update bundle we have also included the stock rom.

    The stock Rom also includes the gestures app and all stock applications , incase you have warranty issues you can revert to the stock ROM aswell.

    Tutorial to revert to Stock 2.2

    Follow Step 1 – Step 5 Above

    Step Six

    • Once the program is running On the right side select the “Stock mmx 2.2” folder 
    • Uncheck the 2 boxes below the file location
    • Remove the battery and usb cable from you A85/ Cherry Magnum 2x / KTouch K700
    • Repeat Step 3 from above and connect the Device to the USB cable
    • Your device will start to downgrade to 2.2

    Step Seven

    • Once Update finishes your device will boot with Stock Micromax Rom.
    • Enjoy!


    Video Coming Shortly!

  • Tacit sonar gauntlet provides Radar tech to the Visually Impared

    Tacit sonar gauntlet provides Radar tech to the Visually Impared

    The Grathio Labs’ Tacit glove, an Arduino powered sonar device that can help the vision impaired navigate foreign environments. It Has 4 ultrasonic sensors that decode objects in the wearers path and send feedback. According to the video below, it takes only seconds to wear and does not interfere with the natural sense of the hand. It has a vey small learning curve and is very easy to adapt to.


    Check out the full video for the technology that drives it and a quick demo of it in action.


    [Grathio Labs]

  • DIY : How to Install Android 2.3 Gigerbread on you Samsung Galaxy Ace

    DIY : How to Install Android 2.3 Gigerbread on you Samsung Galaxy Ace

    Today we are going to show you how to Install GingerBread 2.3 on your SAMSUNG GALAXY ACE mobile PHONE.


    What you will NEED!


    1. A Samsung Galaxy ACE (DUH!).

    2. The 2.3 Firmware S5830( click here to download password =  samfirmware.com).


    3. ODIN downloader (click here to  download). and USB Driver (Click HERE)

    4. OPS files (click here to download).

    5. A windows PC + samsung data cable.


    Important NOTES:

    If you get errors after upgrade : i.e. error: phone application has stopped working or get constant crashes,do the following:

    To fix phone not working, initiate restore phone to factory settings command from Settings – Privacy

    TAKE SERIOUS CONSIDERATION BEFORE UPGRADING AND HAVE YOUR BACKUP IMAGE READY IF SOMETHING GOES WRONG – use the OLD FIRMWARES: (All backup images can be found here)

    • Make sure your device is fully charged!
    • BE sure to backup all your data!
    • You are doing this at your own risk, Although, This will NOT void your warranty!
    • Your phone does not need to be rooted to get this working.


    AFTER BACKUP – FACTORY RESET YOUR PHONE BY ENTERING THE FOLLOWING CODE

    *2767*3855#


    STEP 1

    Download all the files above, and make sure you have the latest version of KIES software installed.

    STEP 2

    Extract the RAR to get a .tar file.

    STEP 3


    Open ODIN Downloader.

    MAKE SURE you select One Package, Auto Reboot and Protect Ops checkboxes.

    Select the Ops file (the file we downloaded earlier).

    And finally select the tar package we extracted from the RAR downloaded earlier.

    (You can also extract the rtar and select packages indivisually)


    NOW CLOSE ODIN.

    STEP 4

    Backup you phone and data with the KIES software (after you are done exit KIES)

    Turn OFF the Galaxy ACE and remove the Battery

    Reinsert The Battery and Press the following buttons together

    CENTER HOME BUTTON + POWER BUTTON + VOLUME DOWN Together

    Hold the buttons together till you see the downloading screen


    STEP 6 (Final Step)

    CLICK START and wait for process to finish, once done your device will automatically reboot and will have Android 2.3 running on it.

    A Few Things you will notice with 2.3

    • The rom runs faster but uses more RAM
    • Video now is up to 640x480px
    • Camera can’t auto focus.
    • The interface is overall nicer looking and runs smooth
    • There are a lot of bugs and it may crash frequently

    Test this out at your own risk, if you have feedback please leave it below

    Rom Files courtesy (samfirmware.com)

  • Samsung Galaxy 3 I5801 gets Android 2.2 FroYo update in India + How To

    Samsung Galaxy 3 I5801 gets Android 2.2 FroYo update in India + How To

    Samsung has finally let out their most awaited update for the Samsung Galaxy 3. Android 2.2 aka Froyo is now available for all those with samsung Galaxy 3s in India and Europe.

    To Update your Device

    Make sure your device is fully charged!

    BE sure to backup all your data!


    Step one

    Download the latest version of Kies

    Step two

    Fully charge your Galaxy 3

    Step three

    Connect via the USB cable to your computer

    Step four

    Fire up kies and let it search for update

    if it does not give you an update, check for update manually by clicking the update button in the bottom row.

    Step Five

    Follow the steps on the screen and your device will begin the new update.

    Few features that are in the 2.2 update –

    • A very colorful menu interface
    • The ability to Install apps to the SD CARD
    • Apart from general Performance boost in processor, better battery and ram management.
    • The 2.2 update also adds a lot of bug fixes and tweaks.

    Please leave your questions and feedback below.

  • How to- Root HTC DESIRE HD – included Downgrade from 1.72.405.3 to 1.32

    How to- Root HTC DESIRE HD – included Downgrade from 1.72.405.3 to 1.32

    So we finally found a perfectly stable way to downgrade and root the HTC DESIRE HD. All credit goes to the devolopers at XDA-DEVELOPERS.com we are just bringing this guide for our readers in a simplified manner.

    Warning: Please note you are doing this at your own risk! there is a high chance that this might damage your device, or make it inoperable. ALL FILES AND TOOLS MENTIONED IN THIS WRITEUP ARE PROPERTIES OF THE DEVELOPERS

    THIS GUIDE IS PURELY FOR EDUCATION

    This guide has been made considering your device is factory unlocked.

    Now that legalities are out of the way lets begin!

    PART 1 : Downgrade

    First and foremost check the version of your bootloader.

    Do this by going to the about phone panel in the settings folder.

    If its 1.72 and above then follow part 1 – else move to part 2

    Lets begin

    What you need :

    • HTC Sync (or ADB drivers)
    • Desire HD with build number 1.72 or higher
    • Make sure the battery is fully charged

    What needs to be done:

    Step one

    Step Two

    Step Three

    • Connect Desire HD to a computer. Charge only, USB Debugging enabled!

    Step Four

    • Open Command prompt and navigate to the downgrade folder
    • If you placed the downgrade folder in your c: drive type in cd/Downgrade
    • It should show C:\Downgrade>

    Step Five

    Carefully type in the following commands one by one

    • adb push psneuter /data/local/tmp
    • adb push misc_version /data/local/tmp
    • adb shell chmod 777 /data/local/tmp/psneuter
    • adb shell chmod 777 /data/local/tmp/misc_version
    • adb shell /data/local/tmp/psneuter
    • adb shell

    If you got “#” in the result, you have temproot! Proceed:

    Now type the following one by one

    • cd /data/local/tmp
    • ./misc_version -s 1.31.405.3

    After its done

    • Put PD98IMG.zip to your SD card. You can close the cmd.
    • Reboot while holding volume down, it will go to the bootloader
    • Let it run the process
    • When it asks – do you want to start update
    • Press the volume up button to begin
    • Let it complete and then boot the phone

    Once you phone boots up – you have successfully downgraded to 1.32 bootloader, all your data has been erased and you will start with a fresh device.

    To begin rooting proceed to Part 2

    PART 2 Rooting The Desire HD

    To root your HTC Desire HD you will need the Visionary tool found here

    What you need

    • HTC Desire HD with bootloaded 1.32
    • Visi0nary tool from the link

    How you will do it

    Step one

    • Download and copy visi0nary tool to your sdcard

    Step two

    • Install and run visionary

    Step three

    • once visionary is running check “Set system r/w after root”
    • and click Temproot now wait patiently till it finishes.
    • once you have successfully Temprooted
    • Click PermRoot the device and wait for it to restart the Device.

    Once your Desire HD reboots – you have successfully rooted your DHD – and you will get superuser permissions.

    The next thing you want to do is to S-off the device

    For that : What you need

    • Windows XP SP2 or higher
    • .NET Framework 4.0
    • HTC Sync (or ADB drivers)
    • Desire HD with stock kernel (or Apache14’s 1.0.7 / 1.1.4 Sense)
    • It will not work on 1.72.405.3 or higher build, or new radio. Downgrade first (using Part 1)

    Step one

    Step two

    • Connect Desire HD – charge only mode + usb debugging on

    Step three

    • In “Desire HD easy radio tool.exe” select option 3 and click “do it now”
    • wait for it to finish

    You have now fully completed the Root process along with downgrade if applicable. If you already know how then you are ready to install custom roms on this. If not, then wait for our second update on the HTC desire HD – which will shine some light on that.

    Information and files : Various articles : xda-developers, Modaco, Phandroid, android-forums – youtube

iGyaan Network
Privacy Overview

This website uses cookies so that we can provide you with the best user experience possible. Cookie information is stored in your browser and performs functions such as recognising you when you return to our website and helping our team to understand which sections of the website you find most interesting and useful.